Ever squint at a grocery list and wonder if your eyes are playing tricks on you?
We’ve all been there – that moment when the print on a menu or the label on a bottle suddenly looks fuzzy, and you feel that tiny panic rise. It’s frustrating, especially when you just want to enjoy a coffee break without juggling a magnifying glass.
Choosing the right reading glasses strength doesn’t have to be a mystery. In fact, it’s a bit like finding the perfect pair of shoes: you need the right fit, the right support, and a style that makes you feel confident.
First, think about when you notice the blur. Is it after an hour of scrolling on your phone, or does it happen the moment you pick up a paperback? That timing tells you a lot about the diopter you’ll need.
Next, consider your age. As we get older, our eyes naturally lose flexibility – a process called presbyopia. Most people start needing low‑plus lenses in their early 40s, while stronger powers become common in the 50s and beyond. But age is just a guideline; the real clue is how your vision feels.
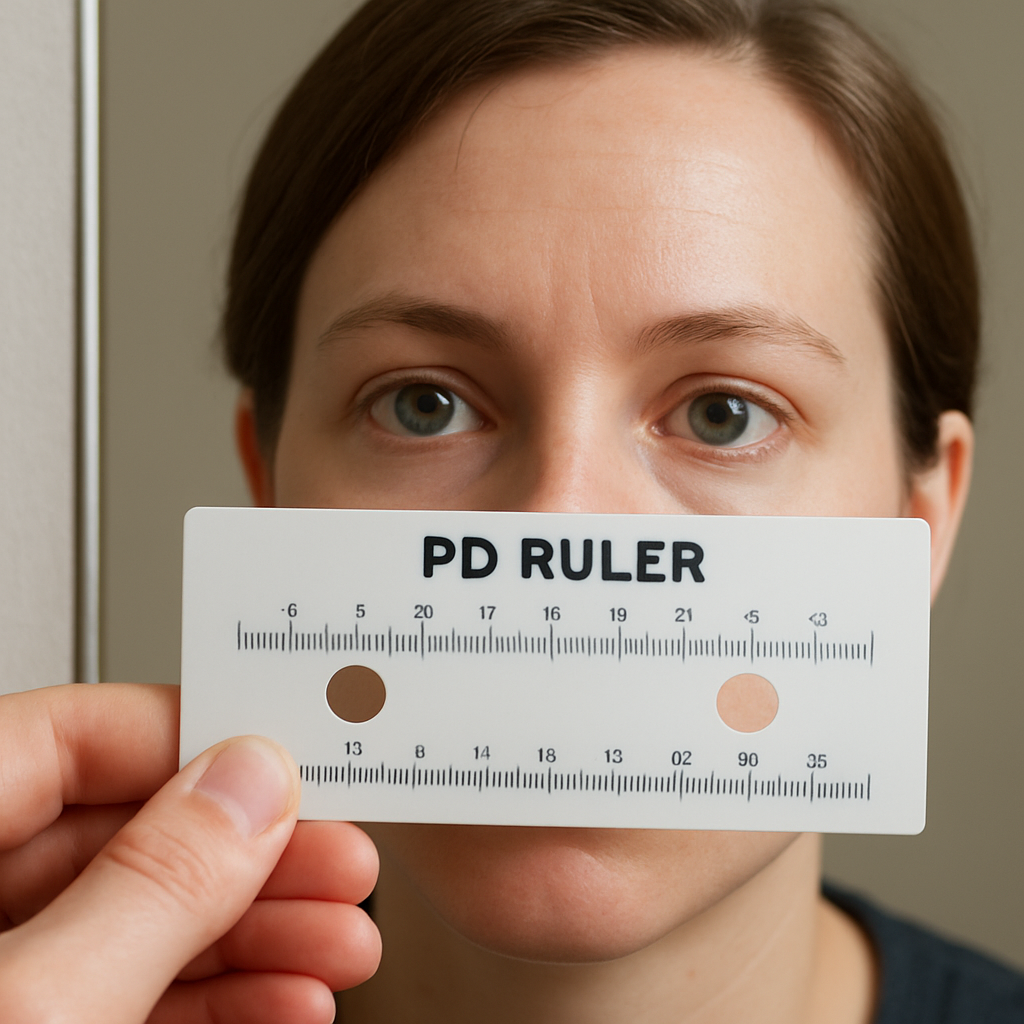
Grab a simple at‑home test: hold a piece of text at about 14 inches (the distance your arm reaches when you read a menu). If the letters look blurry, try a pair of over‑the‑counter reading glasses starting at +1.00. If that still feels soft, move up to +1.50, and so on. You’ll know you’ve hit the sweet spot when the words snap into focus without straining.
Don’t forget lighting. A well‑lit room can mask a weaker prescription, while dim settings reveal it. And if you split your time between screens and paper, you might want a slightly lower strength for digital use to reduce eye strain.
So, what’s the next step? Take note of the diopter that feels just right, and keep that number handy when you shop. Whether you browse our selection online or visit a local optician, having that baseline makes the whole process smoother.
Ready to see clearly again? Let’s dive deeper into how to match that strength to the perfect pair of reading glasses.
Finding the right reading glasses strength is as simple as testing a few diopters, noting comfort, and matching the lens to your daily tasks without straining your eyes.
Keep your preferred power handy, consider lighting and screen use, and browse BuyEyeglass for styles that fit both function and fashion today.
Ever caught yourself squinting at a recipe card or the tiny print on a medication bottle and thought, “What’s wrong with my eyes today?” You’re not alone—those moments are the breadcrumbs that tell us our vision is asking for a tweak. Before you rush to pick a pair of reading glasses, take a step back and actually listen to what your eyes are saying.
First, notice when the blur shows up. Does it creep in after an hour of scrolling on your phone, or does it happen the second you pick up a paperback? Jot down the activity, the lighting, and the distance you’re holding the material. That little log becomes a diagnostic sketch, pointing you toward the right diopter range.
Next, run a quick at‑home focus test. Hold a line of text about 14 inches away—roughly the length of your forearm. If the letters look fuzzy, try a pair of over‑the‑counter readers starting at +1.00. Move up in 0.25 increments until the words snap into clarity without any strain. When you hit that sweet spot, note the power; it’s your baseline. Need a visual reference? Check out our Reading Glasses Strength Chart by Age for a quick comparison.
But don’t stop at the numbers. Think about your overall eye health. If you’ve noticed increasing difficulty seeing distant objects, frequent eye fatigue, or any unusual glare, it might be time to get a professional opinion. A seasoned eye surgeon like Dr. Rahul Dubey can evaluate whether underlying conditions are influencing your near‑vision needs and advise if a comprehensive eye exam is warranted.
While you’re assessing, consider your lifestyle habits. Are you glued to a screen for eight hours a day? Do you read in dim corners of your home? Prolonged screen time can cause digital eye strain, which often feels like a mild headache after a reading session. Balancing your reading glasses strength with blue‑light blocking features can ease that strain.
Beyond lenses, your overall wellness plays a role. Proper posture, regular breaks using the 20‑20‑20 rule, and staying hydrated keep your eyes supple. If you’re looking for a broader health perspective, the team at XLR8well offers proactive wellness tips that complement your vision routine—think nutrition for eye health and ergonomic workspace tweaks.
Now that you’ve gathered data, it’s time to translate it into action. Create a simple checklist:
When you’ve filled it out, you’ll have a clear picture of the strength you need and whether you might benefit from specialty lenses, like blue‑light blocking or progressive options.

Finally, keep that diopter number handy. Write it on a sticky note, save it in your phone, or add it to your favorite eyewear wishlist. When you browse our collection, you’ll be able to filter instantly, saving time and preventing the “guess‑and‑check” frustration. You’ve done the heavy lifting—now let the right pair of glasses do the rest.
Now that you’ve taken note of when the blur shows up, it’s time to decode the numbers you’ll see on the packaging.
Diopter is just a fancy word for the lens’s magnifying power. A +1.00 diopter bends light enough to let you see something about 1 foot away clearly; a +2.50 lets you focus on text that’s roughly 5 inches away. The higher the number, the stronger the boost.
Why does that matter? Because the right diopter lets your eyes relax instead of working overtime. If you pick a power that’s too low, you’ll keep squinting. Too high, and everything looks magnified and a bit “off‑center.”
Here’s a quick way to picture it: imagine holding a menu at arm’s length. With a +1.00 pair, the letters become legible at roughly 12‑14 inches. Switch to +2.00 and you can bring the menu in to 6‑7 inches and still read comfortably.
So, how do you figure out which number fits you? The answer lives in three simple variables: age, typical reading distance, and lighting.
Age is a rough compass, not a rule. Most people in their early 40s land between +1.00 and +1.50, while folks in their mid‑50s often need +2.00 to +2.50. The range can shift a bit depending on how much screen time you log or how often you need to read fine print.
But don’t let a chart dictate you. Your personal reading distance is the real driver.
Grab a book or your phone and hold it about 14‑16 inches from your eyes – that’s the length of an average adult forearm. If the text looks fuzzy, note that distance.
Now try an over‑the‑counter pair starting at +1.00. Move the material closer until the words snap into focus without you having to squint. If you have to pull it back to about 10 inches, you’re probably at the right spot for +1.50. If you still need to hold it at 5 inches, bump up to +2.00.
Repeat the test with a half‑moon frame or a “computer reader” style if you spend a lot of time at a monitor. Those designs are built for a 20‑26 inch viewing range, so you’ll often end up a half step lower than your print‑reading power.
For a deeper dive into how diopters translate to real‑world magnification, see this guide on understanding diopters and reading‑glasses strength.
Lighting plays a sneaky role. In bright daylight a +1.00 may feel sufficient, but in a dim kitchen the same lens can feel weak. If you often read in low light, add a half step.
If you have astigmatism or need more than +3.00, OTC readers might not cut it. Those situations call for a professional eye exam and a custom prescription. That’s why we recommend a quick virtual check‑up if you notice double vision or persistent headaches.
The at‑home test described by Biology Insights walks you through using a standard reading chart and adjusting diopters in 0.25 steps.
Still not sure which strength feels right? Watching a short demo can clear things up.
Notice how the presenter moves the text closer and switches lenses? That visual cue mirrors the arm‑length test we just described.
Here’s a quick checklist you can print or save on your phone.
Understanding diopter numbers isn’t rocket science, but it does save you from buying the wrong pair and wasting money. Armed with these steps, you can walk into BuyEyeglass (or any retailer) knowing exactly which strength will keep your eyes happy.
Okay, you’ve zeroed in on a diopter that feels comfortable at arm’s length. Now the real trick is making sure that same power works when the book, phone, or recipe card sits at the distance you actually use.
Why does distance matter? Because the eye‑lens system is a simple lever: the closer the object, the more magnification you need. A +1.00 pair will let you read comfortably at roughly 12‑14 inches, but if you habitually bring the page down to 6 inches you’ll start to feel the “push” of an under‑powered lens. Conversely, a +2.00 pair may be perfect for a tablet held 8 inches away but will make a newspaper look like it’s been viewed through a magnifying glass if you keep it at arm’s length.
1. Pick three common reading scenarios. For many of us that’s a paperback, a smartphone, and a kitchen recipe card. Note the typical distance you hold each – roughly 14‑16 inches for a book, 10‑12 inches for a phone, and 8‑10 inches for a recipe.
2. Grab the diopter you think is right. Hold the book at its usual distance. If the text is sharp without squinting, mark that distance as “good.” If you need to pull the book closer than usual, the lens is too weak; step up by .25. If the words look oversized or the edges look blurry, the lens is too strong; step down.
3. Repeat with the other two devices. Switch to your phone and keep the same pair on. Many people discover they need a half‑step lower power for screens because the display emits light and the eye relaxes a bit differently. Then try the recipe card – if you’re constantly leaning over the counter, you may need a half‑step higher power.
4. Record the “sweet spot” for each distance. Write down something like: Book = +1.25, Phone = +1.00, Recipe = +1.50. This quick table becomes your personal reference whenever you shop.
Emma, a freelance writer in her late 40s, loves reading novels on the couch but spends most of her day scrolling on a laptop. She found that a +1.50 pair let her enjoy her paperback without moving it closer, yet the same lenses made her screen text look a bit chunky. By swapping to a +1.25 “computer reader” style for her desk, she eliminated the extra glare and kept her neck posture comfortable.
Mark, a retired carpenter, always reads his DIY manuals at the kitchen table. He holds the paper about 9 inches away. When he tried a generic +1.00 pair, he had to crane his neck forward, causing a sore shoulder. Moving up to +1.75 let him keep the manual at his natural 9‑inch spot, and the extra magnification reduced eye fatigue during long projects.
These anecdotes show the same diopter isn’t a one‑size‑fits‑all; you’re really matching strength to the distance you *actually* use.
Bottom line: matching strength to reading distance is all about observing where you naturally bring the page and then confirming that the diopter lets you keep that distance without extra effort. Once you have your distance‑specific power notes, buying the right pair at BuyEyeglass becomes a quick check‑box rather than a guess.
Now that you’ve nailed the diopter and the reading distance, the next piece of the puzzle is what the lenses themselves are made of and how they’re finished. The right material and coating can mean the difference between a pair that feels like a feather and one that drags your eyes down at the end of the day.
So, what should you look for when you’re scrolling through options on BuyEyeglass? Let’s break it down into two easy decisions: lens material first, then the coating suite that matches your lifestyle.
Think of lens material as the foundation of a house. It determines weight, durability, and optical clarity. Here are the most common choices you’ll run into.
CR‑39 plastic is the workhorse of the industry. It’s lightweight, offers sharp optics for low‑plus strengths, and takes coatings like anti‑reflective or scratch‑resistant layers without a hitch. If you mostly read paper books or recipes around the kitchen, CR‑39 usually does the job without breaking the bank.
Polycarbonate steps in when you need extra toughness. It’s about 30 % lighter than glass and shatter‑resistant, which makes it a solid pick for active folks who wear their readers while gardening, cooking, or moving around the house. The trade‑off is a tiny dip in pure optical clarity, but most people won’t notice it in everyday use.
High‑index lenses shine for stronger prescriptions. Because they bend light more efficiently, they stay thinner and lighter even at +2.00 or higher powers. If you’ve measured that you need a stronger diopter for close‑up tasks, high‑index material prevents the lenses from looking bulky.
Trivex blends the best of polycarbonate and high‑index: impact resistance, lightweight feel, and excellent clarity. It’s a bit pricier, but if you spend long hours at a desk and want a lens that won’t fog or scratch easily, it’s worth the extra few dollars.
Glass still exists for the purist who craves crystal‑clear optics. It’s heavier and can shatter, so it’s best reserved for occasional indoor use where you value ultimate sharpness above all else.
Even the best material can feel uncomfortable without the right finish. Here are the three coatings that most readers find indispensable.
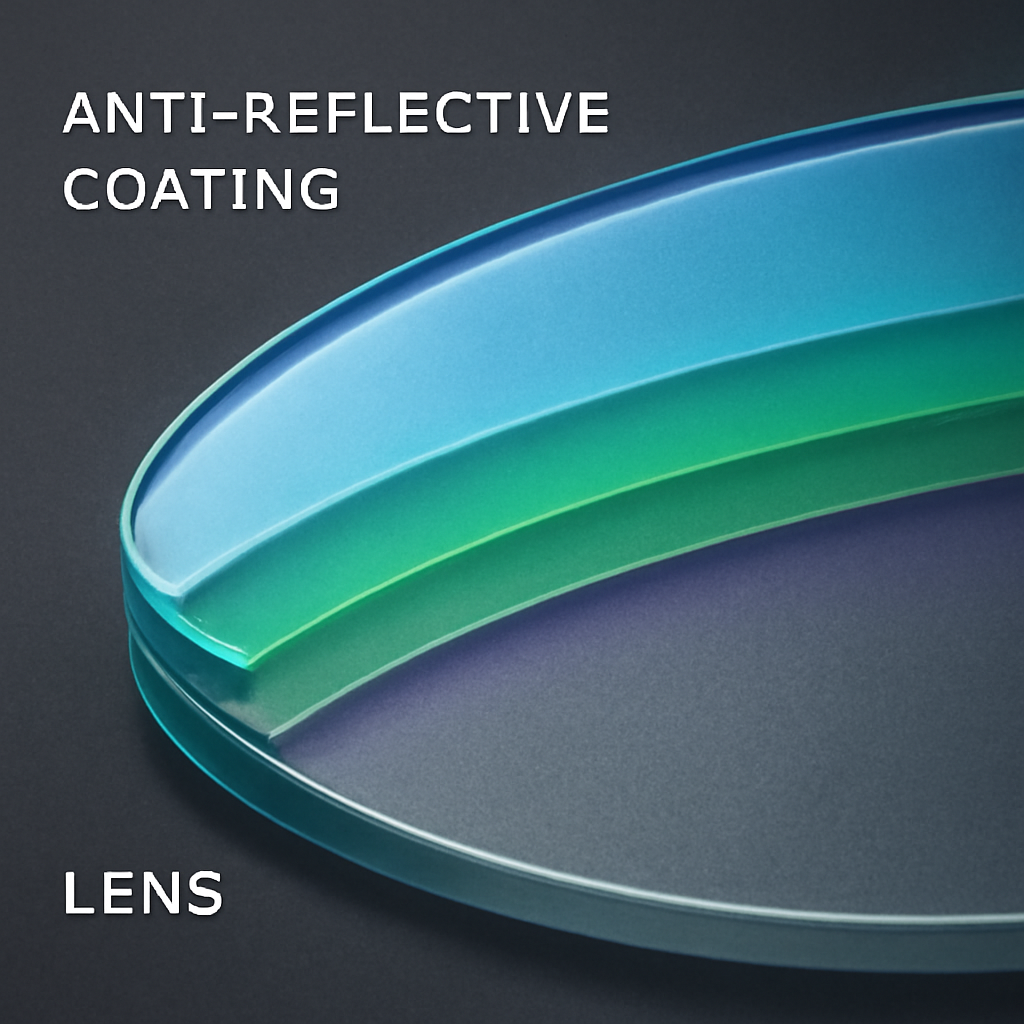
Anti‑reflective (AR) coating wipes out the glare that bounces off screens, kitchen lights, and car headlights. If you split your day between a laptop and a paperback, AR keeps the lenses clear and reduces eye strain.
Scratch‑resistant coating is a must for any plastic lens. A tiny scratch can turn a perfect view into a distracting pattern, especially with higher powers. Look for “hard‑coat” or “scratch‑proof” labels on the product page.
Blue‑light filter is a bonus for digital readers. It cuts the high‑energy light that contributes to fatigue during long scrolling sessions. Many of our customers report that adding a blue‑light layer lets them read on a phone for an extra hour without the usual eye‑tired feeling.
And don’t forget UV protection. Even if you only wear your readers indoors, a quick step outside can expose your eyes to harmful rays. Most polycarbonate and Trivex lenses have built‑in UV blocking, but CR‑39 and high‑index usually need an extra UV coating.
Imagine you’re a hobbyist who spends evenings stitching patterns and mornings scrolling recipes on a tablet. You might choose a high‑index +1.75 lens for the stitching (to keep the lenses thin) paired with an AR‑plus‑blue‑light coating for the tablet sessions. The result is a single pair that handles both worlds without you having to switch glasses mid‑day.
Another real‑world scenario: a retiree who loves bird‑watching outdoors and reads the newspaper at the kitchen table. Polycarbonate lenses give the durability needed for the outdoor trips, while the built‑in UV layer protects the eyes from bright sunlight. Adding a scratch‑resistant coat ensures the lenses survive the occasional tumble into a bird‑watching bag.
Bottom line: the lens material and coating combo is the final piece that turns a good pair of reading glasses into a great, long‑lasting one. Take a minute to map your daily habits, pick the material that aligns with those habits, and then stack on the coatings that smooth out the rough edges. When you do, you’ll notice the difference the very next time you pick up a book, a phone, or a recipe card.
Alright, you’ve narrowed down the diopter, the material, and the coatings. Now comes the part that feels a bit like a first date: trying the glasses on, seeing how they behave, and deciding if they’re “the one.”
First thing you’ll notice is how heavy the lenses feel. If they’re noticeably heavier than the frame, that could be a sign you’re dealing with polycarbonate or a high‑index lens that’s still a tad thick. A good rule of thumb: the lenses should feel lighter than the frame itself. Pick them up, let them rest on your nose for a few seconds, and notice if your cheekbones or the bridge are doing any extra work.
Does a heavier pair make you think, “I’ll get a headache later”? That’s a red flag. Lightness matters especially if you plan to wear them for marathon reading sessions or while cooking.
Grab three everyday items – a paperback, your phone, and a recipe card – and hold each at the distance you normally use. Put the glasses on and see whether the text snaps into focus without you having to crane your neck or pull the object closer.
Take notes in a quick table (see below) – it turns the subjective feeling into something you can compare side‑by‑side.
Turn on a bright kitchen light or sit near a window. Do you see any ghostly reflections on the lenses? If yes, the anti‑reflective coating either isn’t applied or isn’t strong enough for your lighting conditions. A quick swipe with a microfiber cloth should clear any smudges; lingering glare after that means you might want a stronger AR layer.
Remember, glare isn’t just annoying – it forces the eyes to work harder, which can lead to fatigue after a half‑hour of reading.
Take a fingertip and gently run it over a corner of the lens. A proper scratch‑resistant coating will feel smooth, almost like glass. If you feel a tiny rasp, that’s a sign the coating is thin or missing. You don’t want a micro‑scratch turning into a visual distraction later.
Adjust the nose pads so the glasses sit evenly on the bridge. They should stay put when you tilt your head forward; if they slide, tighten them a bit. The temples should hug the ears without digging in. A snug but comfortable fit prevents the lenses from shifting, which would change the focal point mid‑read.
If you’re not comfortable tweaking the pads yourself, our quick‑guide on nose‑pad adjustment (available on the BuyEyeglass site) walks you through it in under two minutes.
Most of us end up with a couple of contenders. Put them both on, repeat the distance tests, and ask yourself: which pair feels more natural? Which one lets you keep the same posture you’d use without glasses? Write down the pros and cons – a simple two‑column list does the trick.
Often the winner is the pair that requires the least mental adjustment. If you catch yourself thinking “I have to tilt my head” or “I’m squinting a little,” that’s the loser.
When you’ve gathered all the data – weight, distance clarity, glare, scratch feel, and fit – you’re ready to finalize. Choose the pair that scores highest across the board, even if it’s a few cents more. The extra investment pays off in comfort and eye health.
And remember, your vision can shift. Set a reminder to repeat this try‑on routine every six months or whenever you notice a change in reading comfort.
| Criteria | What to Look For | Notes / Decision Rule |
|---|---|---|
| Weight | Lenses feel lighter than the frame | If heavy, consider lighter material (polycarbonate or high‑index) |
| Distance Clarity | Book, phone, recipe all clear at natural holding distance | Adjust diopter by ±0.25 until no extra reach is needed |
| Coating Performance | No glare, smooth scratch‑resistant feel | Upgrade AR or scratch‑coat if reflections or rasp feel |
| Fit | Nose pads sit evenly, temples stay put | Tighten pads or choose a different frame style if slipping |
Take these steps, compare your notes, and you’ll walk away with a pair of reading glasses that truly feels custom‑made for you. Happy reading!
Start by holding a line of text about 14‑inches away – that’s roughly the length of an arm’s reach. Grab a low‑plus pair (+1.00) and see if the words snap into focus without squinting. If they still look fuzzy, move up by .25 until the text feels crisp. The sweet spot is the power where you don’t have to pull the page closer or strain your eyes.
It’s pretty common to notice a subtle change as the day goes on. Try the same pair at two different times – once after you’ve just woken up and again after a few hours of screen time. If you need a half‑step stronger later in the day, keep a second, slightly higher‑plus pair handy for those evening reading sessions.
Often you can, but many people find screens feel a little “pushy” with the same power they use for paper. Because the display emits its own light, a half‑step lower diopter usually feels more comfortable. Test your favourite pair while scrolling on your phone; if the text looks oversized, drop down .25 and see if it eases the strain.
Vision isn’t static – hormones, screen habits, and even sleep quality can tweak it. A good rule of thumb is to revisit your at‑home test every six months or whenever you notice new eye‑fatigue patterns. Mark the date on your calendar, repeat the arm‑length test, and adjust the diopter by .25 steps if needed.
Yes, the material can subtly influence perceived strength. Polycarbonate and Trivex are lighter, so they often feel less “pushy” than heavier CR‑39 at the same diopter. High‑index lenses stay thin even at higher powers, which can make the magnification feel smoother. When you try on a pair, pay attention to weight – lighter lenses usually translate to a more comfortable visual experience.
If you spend a lot of time on screens, a blue‑light filter is a smart add‑on. It doesn’t change the diopter, but it reduces high‑energy light that contributes to eye‑strain. Pair a slightly lower power for digital use with a blue‑light coating, and you’ll often notice less fatigue during long scrolling sessions.
First, grabbing the highest power they think they need and ending up with magnified text that feels “off‑center.” Second, ignoring lighting – bright rooms can mask a weak lens, while dim settings reveal it. Third, not testing multiple distances – a pair that works for a book might feel heavy for a recipe card. Avoid these by testing at your typical reading distance, in your usual lighting, and adjusting in .25 steps.
Let’s wrap up what we’ve uncovered about how to choose reading glasses strength. First, remember that the right diopter is personal – it hinges on your typical reading distance, lighting, and whether you split time between paper and screens. We’ve shown you how a quick arm‑length test, a half‑step tweak, and a glance at age‑based averages can point you in the right direction without a pricey eye‑exam.
Second, the material and coating you pick will shape how that strength feels day‑to‑day. A lightweight polycarbonate lens will seem less “pushy” than a heavier CR‑39 at the same power, while an anti‑reflective layer keeps glare from stealing your focus during evening cooking. If you spend hours on a phone, a blue‑light filter can soften digital fatigue without altering the diopter.
Finally, treat the process like a habit. Re‑evaluate every six months, note any shifts in strain, and adjust by .25 steps as needed. A simple checklist – weight, distance clarity, coating performance, fit – turns the trial into a quick routine.
So, what’s next? Grab a low‑plus pair, run the arm‑length test, and let your eyes guide you. When you’ve nailed the sweet spot, buying the perfect pair on BuyEyeglass becomes a confidence‑boosting finish. Happy reading!