Ever grabbed your glasses off the nightstand, only to feel that weird wobble as the arms flop like tired wings? It’s that moment when you wonder if you’re about to lose your favorite frames forever.
We’ve all been there—trying to read a menu or scroll through a recipe, and the glasses slide down, or the arms feel loose enough to snap at any second. It’s frustrating, especially when you’ve just bought a stylish pair that makes you feel confident.
Good news: you don’t need a pricey optician visit to fix it. In our experience, a few simple tools and a bit of patience can tighten glasses arms at home, restoring that snug, comfortable fit you love.
First, grab a tiny screwdriver—most eyeglass frames use a tiny Phillips or flathead that fits the tiny screws on the hinge. If you don’t have one, a precision set from any hardware store will do. Gently tighten the screw by turning clockwise, but stop before you feel resistance; overtightening can strip the thread.
What if the screw is missing or stripped? A tiny dab of clear nail polish or a drop of super glue on the threads can give enough grip to hold the arm in place—just be careful not to let the glue seep onto the lens.
Sometimes the issue isn’t the screw at all. The hinge itself can become loose from wear. A quick check: hold the arm and give it a gentle wiggle. If there’s play, a small piece of rubber from a pen cap can be slipped into the hinge slot to add friction.
And don’t forget the little details that make a big difference: make sure the nose pads are snug, because a loose nose pad can shift weight and make the arms feel looser. Adjusting them is another quick win that pairs perfectly with tightening the arms.
So, how to tighten glasses arms at home? Identify the screw, use the right screwdriver, tighten just enough, and consider a tiny amount of adhesive or a rubber shim if needed. It’s a straightforward fix that saves you time, money, and the annoyance of constantly readjusting your frames.
Ready to give your glasses a fresh, secure fit? Let’s dive into the step‑by‑step guide that walks you through each tweak, ensuring your glasses stay exactly where they should—on your face, not sliding off the table.
If your glasses arms keep wobbling, a quick, careful tweak with just a tiny screwdriver can restore the snug fit you want. Here’s how to tighten glasses arms at home: locate the screw, turn it clockwise a turn, and if needed add a shim or a dab of nail polish.
Ever pick up your glasses and feel that odd wobble, like the arms are about to take off on their own? It’s that moment when you wonder if the frames are about to betray you mid‑sentence. First thing to do is pause, hold the glasses up, and give each arm a gentle wiggle. If one side feels looser than the other, you’ve found your culprit.
Grab the arm you suspect and look at the hinge. Do you see a tiny screw barely peeking out, or is the screw missing entirely? Often the problem isn’t the frame itself but a stripped or loosened screw. A quick visual inspection can save you a trip to the optician.
Next, check the alignment of the temple pieces. When the arms are correctly seated, they should sit snugly against the side of your head without any play. If you notice a gap or the arm tilts inward, that’s a sign the hinge is loose. Try gently pulling the arm away from the frame; you should feel a slight resistance, not a free swing.
While you’re at it, take a quick look at the nose pads. Loose nose pads can shift the weight distribution, making the arms feel floppier. If you need a refresher on how to tighten those, our guide on how to adjust nose pads on glasses walks you through the process in just a few minutes.
Now, let’s talk tools. Most eyeglass hinges use a tiny Phillips or flat‑head screw. If you have a precision screwdriver set, that’s perfect. If not, a small needle‑nose plier can help you grip the screw head without stripping it. Remember, turn clockwise just a quarter turn at a time – you’ll feel the arm tighten up gradually.
Sometimes the screw is so tiny it’s practically invisible. A good trick is to shine a flashlight behind the hinge; the light will highlight any protruding threads. If you can see the threads but the screw is missing, a tiny dab of clear nail polish can act as a temporary fix – just don’t let it seep onto the lenses.
Watch this short video for a visual walk‑through of the inspection process:
After the video, give the hinge another gentle test. Hold the arm and try to twist it forward and back. If there’s still noticeable wobble, you might need a tiny piece of rubber (like the end of a pen cap) slipped into the hinge slot to add friction. This cheap hack works wonders for older frames that have worn out a bit.
If you’ve tried tightening the screw and the arm still feels loose, it could be a sign of a deeper issue – perhaps the hinge housing itself is cracked. In that case, it’s wise to consult a professional. An eye specialist such as Dr Rahul Dubey can advise whether a repair is feasible or if you need a replacement frame.
Finally, give your glasses a quick test run. Put them on, lean forward, and see if the arms stay put while you read or look around. A snug fit should feel like a gentle hug, not a loose handshake.
Now that you’ve spotted the loose arm, the next thing you need is the right toolbox. It sounds simple, but having the correct screwdriver and a few safety basics can mean the difference between a smooth fix and a cracked hinge.
First up, the screwdriver. Most eyeglass hinges use a tiny Phillips‑type or flat‑head bit—think the size of a grain of rice. If you’ve got a precision set from a hardware store, grab the #0 or #00 Phillips. No set? A small flat‑head from a watch‑repair kit works just as well.
You might be wondering, “Do I really need a magnetic tip?” The short answer: yes, if you’ve ever watched a screw disappear into the crevice of a hinge. A magnetic tip keeps the screw glued to the driver, so you don’t lose it under the frame.
Next, a good light source. A desk lamp with a flexible arm or even your phone’s flashlight will let you see the tiny screw head without squinting. A magnifying glass or a pair of reading glasses can also give you that extra pop‑up clarity.
Safety tip number one: protect your lenses. A small piece of soft cloth—like the microfiber pouch that comes with most glasses cases—should be placed over the lenses while you work. It prevents accidental scratches if the screwdriver slips.
Safety tip two: keep steady hands. If you’re feeling a bit wobbly, prop the glasses on a soft towel or a silicone mat. This gives you a non‑slip surface and cushions the frames, so you don’t bend them while you tighten the screw.
And don’t forget the tiny adhesive backup. A dab of clear nail polish or a drop of super‑glue can act as a temporary thread lock when the original threads are stripped. Just remember: let it dry fully before you try turning the screw again—otherwise you’ll end up with a gummy mess.
If you’re a visual learner, the short video below walks through each tool and safety step in under two minutes.
Now that the gear is laid out, let’s run through a quick checklist before you start the actual tightening:
When you’ve checked off every item, you’re ready to move on to the next step—actually tightening that screw without turning your glasses into a DIY disaster.
A final safety reminder: never force a screw. If you feel resistance, stop. Over‑tightening can strip the thread or crack the tiny hinge barrel. Instead, give the screw a gentle quarter‑turn, test the arm’s movement, and repeat until the arm feels snug but still rotates smoothly.
And if you ever feel uncertain—maybe the hinge feels loose even after a few turns, or the screw won’t stay—take a breather. It’s perfectly okay to set the glasses aside, double‑check your tools, or swing by a local optician for a quick look. A minute of professional advice can save you a broken pair later.
Bottom line: a proper toolset and a couple of safety habits make the whole process feel almost effortless. Grab your #0 Phillips, lay a soft cloth over the lenses, and you’ll be back to a secure fit in no time.
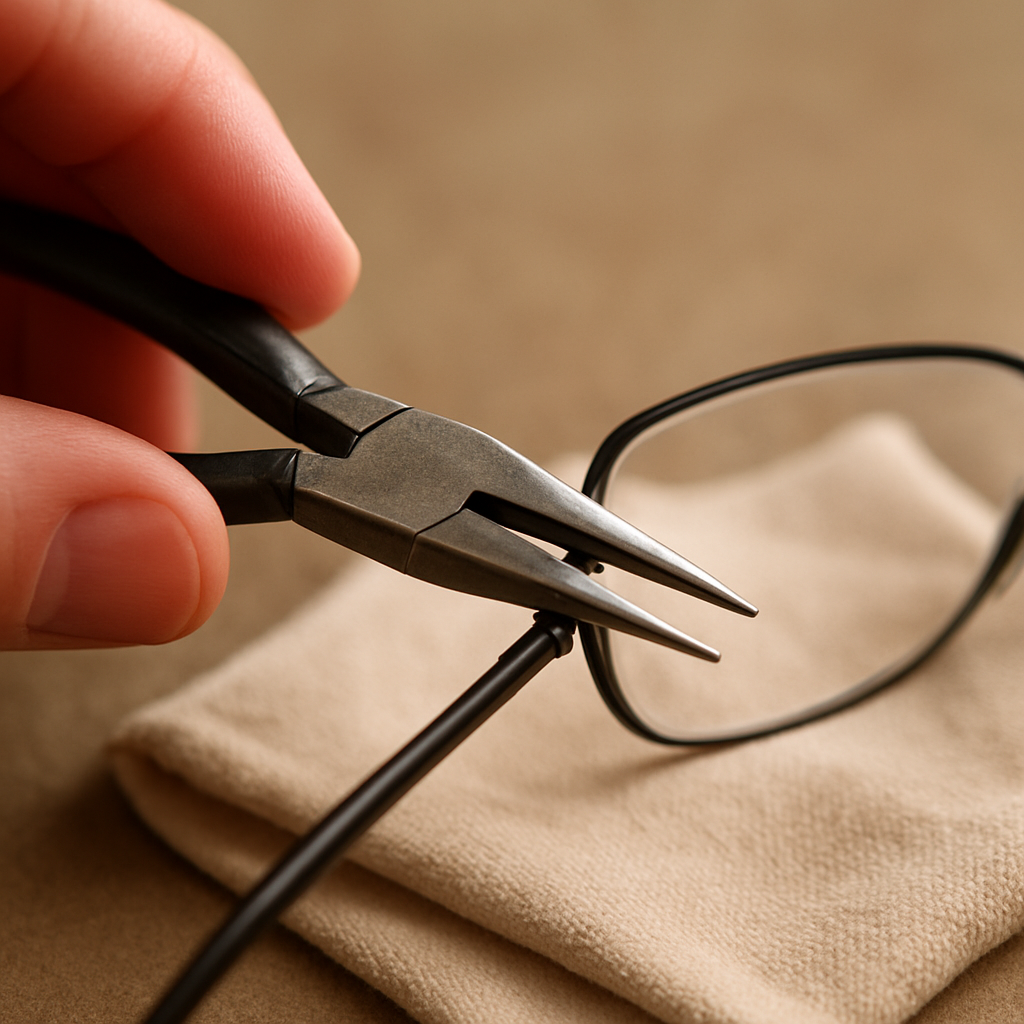
Now that you’ve got the right screwdriver in hand, it’s time to actually tighten that wobbling arm. You might be wondering, “Do I really need pliers?” The answer is: not always, but they can be a lifesaver when the screw is stubborn or the hinge is a bit bent.
If the screw sits flush or is slightly recessed, a tiny Phillips #0 will spin it nicely. But when the screw head is stripped or the arm has drifted out of alignment, a little extra leverage helps you coax it back without forcing the metal.
That’s where needle‑nose pliers (or a small flat‑head screwdriver used as a lever) come in. They give you controlled pressure, letting you bend the arm just enough to re‑engage the threads.
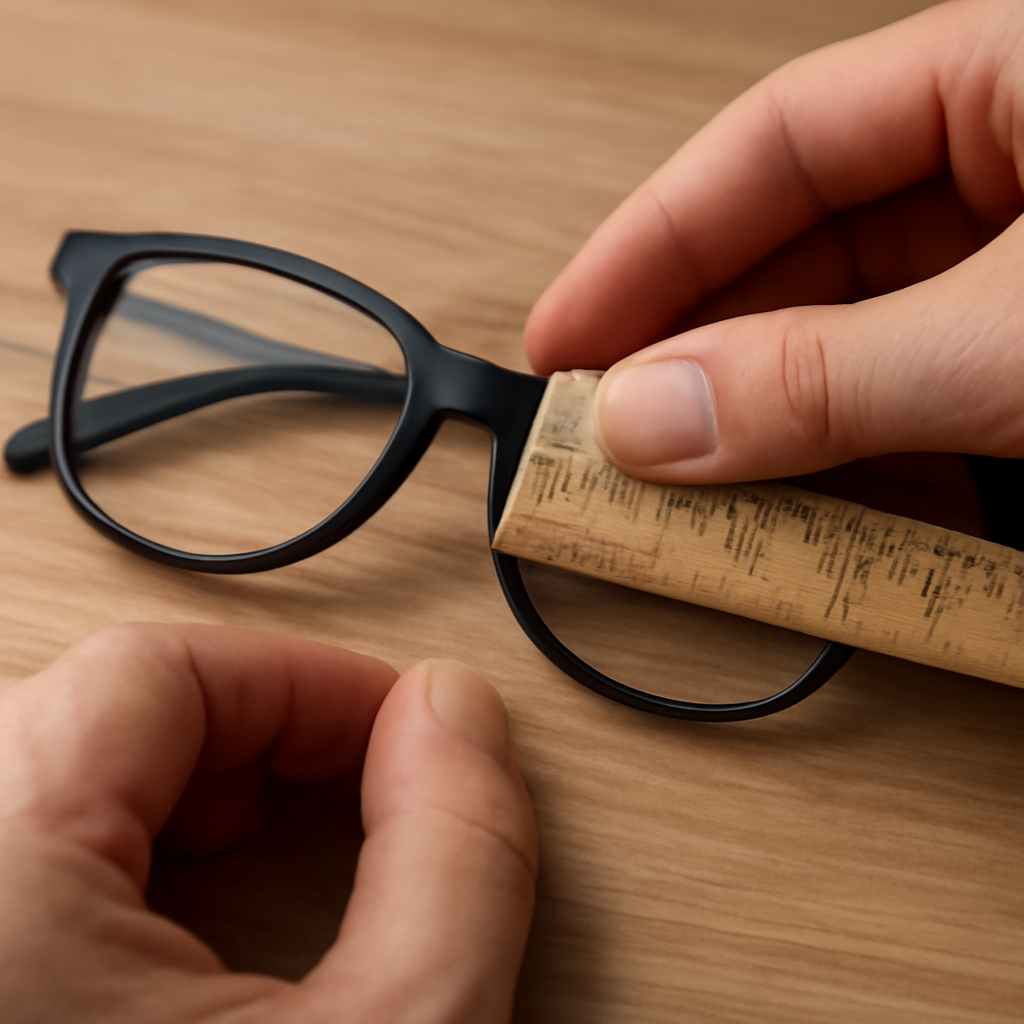
1️⃣ Stabilise the frame. Place the glasses on a soft silicone mat or a folded towel, lens side up. This keeps the lenses from scratching and stops the frame from sliding.
2️⃣ Identify the hinge barrel. Look at the tiny metal tube where the arm meets the front of the frame. If the arm feels loose, the barrel might be slightly out of position.
3️⃣ Grip the arm near the hinge. Using needle‑nose pliers, gently squeeze the metal arm about 5‑6 mm from the hinge. Don’t clamp too hard – you just want enough friction to hold the arm steady.
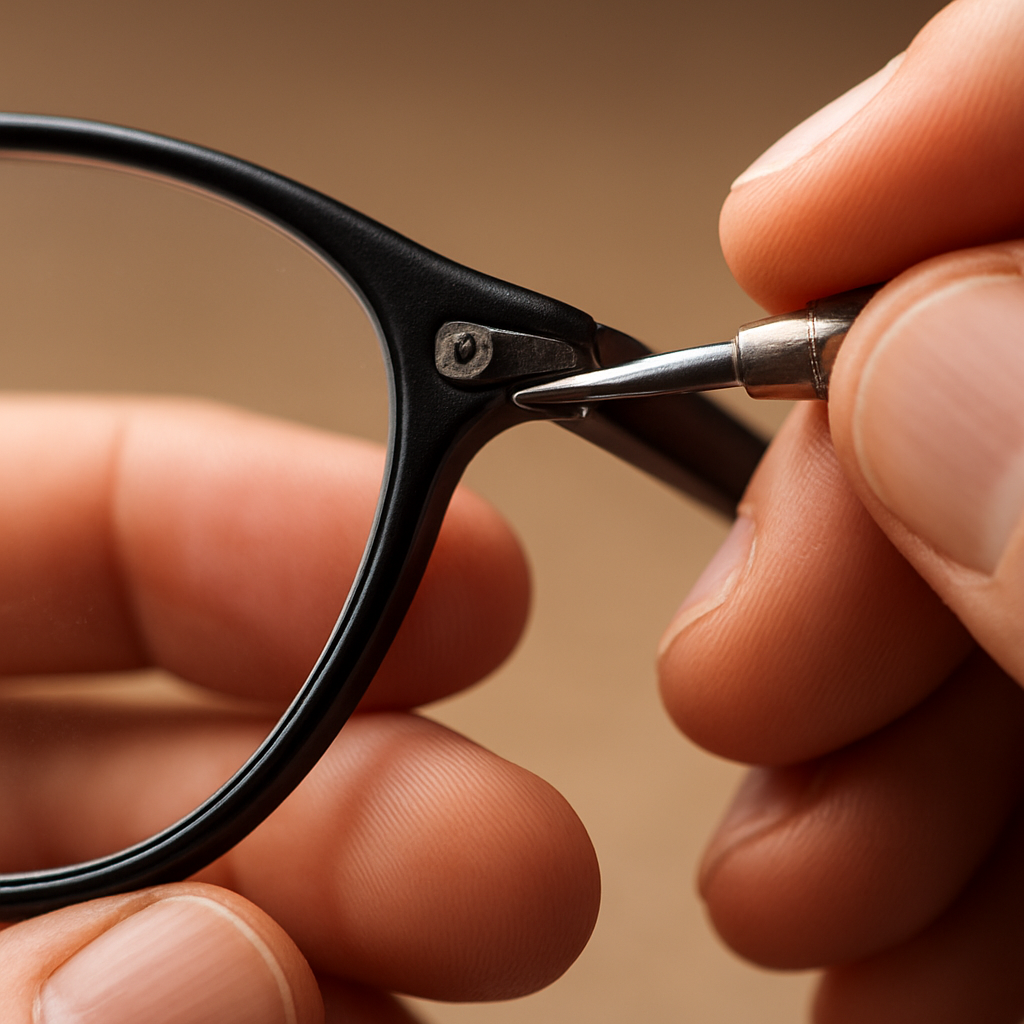
4️⃣ Turn the screw. While keeping the pliers steady, insert the Phillips tip into the screw head and turn clockwise a quarter‑turn. Release, check the arm’s movement, then repeat until the arm feels snug but still pivots smoothly.
5️⃣ Fine‑tune the angle. If the arm still wiggles, use the pliers to nudge the hinge barrel inward a hair‑step. A tiny bend of 1‑2 mm can make a huge difference in stability.
6️⃣ Test the fit. Put the glasses on and swing your head gently. The arm should stay in place without any clicking or wobbling.
Some frames, especially older metal ones, use a flat‑head screw. In that case, a thin flat‑head tip works better than a Phillips. The trick is the same: apply gentle, incremental turns and watch the arm’s tension.
If you don’t have pliers, you can wrap a small piece of masking tape around the tip of the flat‑head screwdriver. The tape adds grip and protects the metal from scratching.
Take Alex, a freelance photographer who spends hours on his feet shooting events. His lightweight metal frames started to sag after a month of rain and humidity. By using needle‑nose pliers to gently bend the hinge barrel back into place and tightening the screw with a flat‑head driver, the arms stopped slipping during fast‑paced shoots.
Then there’s Priya, a university student who bought a cheap acetate pair online. The screw head was stripped after a few weeks of daily use. She wrapped a tiny piece of rubber from a pen cap around the screwdriver, gave it a firm but controlled turn, and the arm snapped back into alignment. She’s been complaint‑free ever since.
If the threads feel a little worn, a dab of clear nail polish (let it dry completely) can act as a temporary thread‑lock. This trick is mentioned in Foster Grant’s guide on tightening glasses. It’s not a permanent fix, but it buys you time until you can replace the screw.
Remember, less is more. Over‑tightening can strip the threads or even crack the hinge barrel, especially on thinner metal frames. If you feel resistance, stop and reassess.
And if you ever feel uneasy – maybe the arm still wiggles after a few attempts – set the glasses aside, double‑check your grip, or swing by a local optician for a quick look. A minute of professional advice can save you a costly break.
By following these tiny, controlled steps, you’ll turn a frustrating wobble into a solid, comfortable fit. It’s a small tweak, but it makes a big difference in how your glasses sit on your face all day.
Alright, you’ve tightened the screw or nudged the hinge a bit. Now it’s time for the part that feels a little like a test drive: you put the glasses on, give the arms a wiggle, and see if they stay put. If they still feel loose, don’t panic – a few quick tweaks can turn a wobble into a solid, comfortable fit.
Think about the last time you tried on a new pair of shoes without walking around the house first. A little “feel test” tells you whether everything lines up the way it should. The same idea applies to glasses. A proper test fit helps you spot lingering play, catch over‑tightening, and decide which fix works best for your frame.
So, what should you actually look for? When the arms are on your ears, they should feel snug but not pinching. The hinge should rotate smoothly, and the lenses should sit level without any tilt. If you notice any clicking, grinding, or a persistent wiggle, that’s your cue to fine‑tune.
| Fix | How to Apply | Pros / Cons |
|---|---|---|
| Screw tightening | Use a #0 or #00 Phillips screwdriver, turn clockwise a quarter‑turn at a time. | Pros: Restores original tension. Cons: Threads can strip if over‑tightened. |
| Clear nail‑polish thread lock | Apply a tiny dab to the screw threads, let dry completely, then re‑insert and turn. | Pros: Quick temporary fix for worn threads. Cons: Not permanent; may need re‑application. |
| Rubber shim (pen‑cap piece) | Cut a small strip, slide into the hinge barrel before re‑assembling. | Pros: Adds friction without chemicals. Cons: May wear out over time. |
| Needle‑nose pliers bend | Gently grip the arm 5‑6 mm from the hinge, nudge the barrel inward a hair‑step. | Pros: Fixes mis‑aligned hinges. Cons: Requires a steady hand; risk of over‑bending. |
Pick the fix that matches what you observed during the test fit. If the arm still wiggles after tightening, the threads are probably worn – that’s where the nail‑polish lock shines. If there’s a tiny gap between the barrel and the arm, a rubber shim or a gentle pliers bend will often seal that space.
1. Put the glasses on. Sit upright, let the arms rest naturally on your ears. Feel for any pinching or looseness.
2. Give a gentle shake. Hold the frames by the lenses and wiggle each arm. Notice where the movement is most pronounced.
3. Identify the culprit. Is the screw still turning? Is there a visible gap? Is the hinge barrel slightly askew?
4. Apply the appropriate fix. Follow the rows in the table above – a quarter‑turn of the screw, a dab of nail polish, a shim slice, or a tiny pliers nudge.
5. Retest. Slip the glasses back on, repeat the wiggle test. If the arm now feels stable, you’ve succeeded. If not, repeat the process or combine two fixes (e.g., nail‑polish lock plus a shim).
6. Check comfort. Walk around, read a line of text, or even jog in place. A secure fit should stay put without you having to readjust every few seconds.
Even the best DIY fix has its limits. If you’ve tried tightening, added a shim, and the hinge still feels loose, the barrel might be cracked or the frame material fatigued. In that case, a quick visit to an optician can save you from a broken pair. It’s the same logic we use at BuyEyeglass – we recommend a professional check when the structural integrity of the frame is in doubt.
Remember, the goal isn’t to turn your glasses into a piece of hardware you’re constantly tweaking. It’s to get them back to that “just right” feeling you had when you first unboxed them. A little test‑fit, a couple of fine‑tunes, and you’ll be back to reading menus, scrolling phones, and looking stylish without a wobble in sight.
Before you reach for a screwdriver, look at the hinge itself. Make sure the screw is actually loose and not just a piece of debris or a mis‑aligned barrel. A quick wiggle test—hold the frame by the lenses and gently shake the arm—will reveal play in the hinge. If you feel a click or see a gap, you’ve identified the problem spot and can move on to the tools.
Most modern frames use a tiny Phillips #0 or #00, roughly the size of a grain of rice. If you only have a flat‑head set, look for a tip that’s about 1 mm wide. Using the correct size prevents stripping the screw head, which would make the fix harder. A magnetic tip is a nice bonus because it keeps the screw from falling into the hinge barrel.
Yes, a dab of clear nail polish can act as a temporary thread‑lock. Apply a tiny dot to the screw threads, let it dry completely (about 10‑15 seconds), then re‑insert the screw and turn clockwise. Super‑glue works similarly but dries faster; use only a microscopic amount to avoid seeping onto the lens. Both methods are short‑term fixes until you can replace the screw.
If the screw won’t turn, needle‑nose pliers can give you extra leverage. First, place the glasses on a soft towel or silicone mat, lens side up. Grip the arm about 5 mm from the hinge—just enough to hold it steady, not to crush the metal. Apply gentle pressure while you turn the screwdriver. The goal is a controlled quarter‑turn, not a forceful twist that could bend the barrel.
Glasses that get tossed into bags or worn during vigorous activities may need a quick check every few weeks. If you notice a slight wobble when you pick them up, tighten the screw by another quarter‑turn. Over‑tightening can strip threads, so it’s better to make small adjustments regularly than to force a big turn later.
If you’ve tried tightening, added a shim, and the hinge still feels loose, the barrel might be cracked or the frame material fatigued. A cracked barrel can’t hold tension no matter how tight you make the screw, and forcing it could snap the arm. In that case, a quick visit to an optician saves you from a broken pair and potential eye‑strain.
Metal frames expand slightly in hot weather and contract when it’s cold, which can make a borderline‑tight screw feel loose. Similarly, humidity can soften certain acetate frames, allowing tiny movements. If you live in a climate with big temperature swings, check the fit after a season change and give the screw a tiny turn if needed. This preventive step keeps the arms snug year‑round.
We’ve walked through every little tweak you need to know for how to tighten glasses arms at home, from spotting a loose hinge to adding a tiny shim or a dab of nail polish.
Remember, the secret is patience: a quarter‑turn of the right screwdriver, a gentle test‑fit, and a quick check after a few days. If the arm still wobbles, it’s probably the barrel or the frame material that’s giving way—that’s the moment to swing by an optician.
In our experience at BuyEyeglass, most customers who follow these steps avoid a costly repair and keep their favourite frames looking fresh for months.
So, what’s the next move? Grab your precision driver, protect your lenses with a soft cloth, and give those arms a controlled turn. Test the fit, and if it feels solid, you’ve just saved time, money, and a lot of frustration.
And if you ever hit a snag you can’t fix, don’t hesitate to reach out to a local professional – a quick visit can prevent a snapped arm and protect your vision.
Now you’re equipped to keep your glasses snug, comfortable, and ready for whatever the day throws at you.
Keep this quick checklist handy and you’ll never worry about loose arms again.