Ever tried to read a menu and felt your glasses slipping off because the nose pads are too loose? I’ve been there – the frustration of a blurry view just because the tiny pads aren’t sitting right.
When the pads sit too low, the lenses tilt, causing distortion and pressure points on the bridge of your nose. On the flip side, pads that are too tight dig into your skin, leaving red marks after a few minutes. Both scenarios make you want to toss the glasses aside.
What’s good news? Adjusting those nose pads is a quick fix you can do at home with a simple tool – often the tiny screwdriver that comes with your frames, or even a clean paperclip. No need to schedule an appointment.
Here’s how we like to walk through it, step by step:
1. Find a stable surface. Lay a soft cloth on a table so the glasses don’t scratch.
2. Identify the pad type. Most modern frames use silicone or rubber pads that swivel on a tiny screw. Some older models have fixed pads – those you’ll need a professional for.
3. Loosen the screw slightly. Turn the screwdriver counter‑clockwise just a quarter turn. You’ll feel the pad give a little.
4. Adjust the angle. Gently push or pull the pad until the glasses sit comfortably on the bridge. A good test is to look straight ahead – the lenses should be parallel to your face.
5. Retighten. Turn the screw clockwise just enough to hold the pad in place, but don’t over‑tighten or you’ll strip the thread.
6. Check the fit. Put the glasses on and move your head side to side. If the pads stay put and the view is clear, you’re done.
If you’re unsure about the screw size, our FAQ – BuyEyeglass page walks you through common tools and even offers tips for kids’ frames, which often have extra‑sturdy pads.
Pro tip: keep a tiny dab of silicone grease on the screw if you notice it loosening over time – it adds friction without damaging the metal.
And remember, a well‑adjusted nose pad not only improves vision clarity but also extends the life of your frames by reducing stress on the hinges.
So, next time your glasses feel off, give those pads a quick tweak and get back to seeing the world crystal‑clear.
Struggling with slipping or tight glasses? A quick tweak of the nose pads restores comfort, clears vision, and extends frame life without a trip to the optician.
Follow our simple step‑by‑step guide to loosen, angle, and retighten the pads using a tiny screwdriver or paperclip, and enjoy a perfect fit instantly.
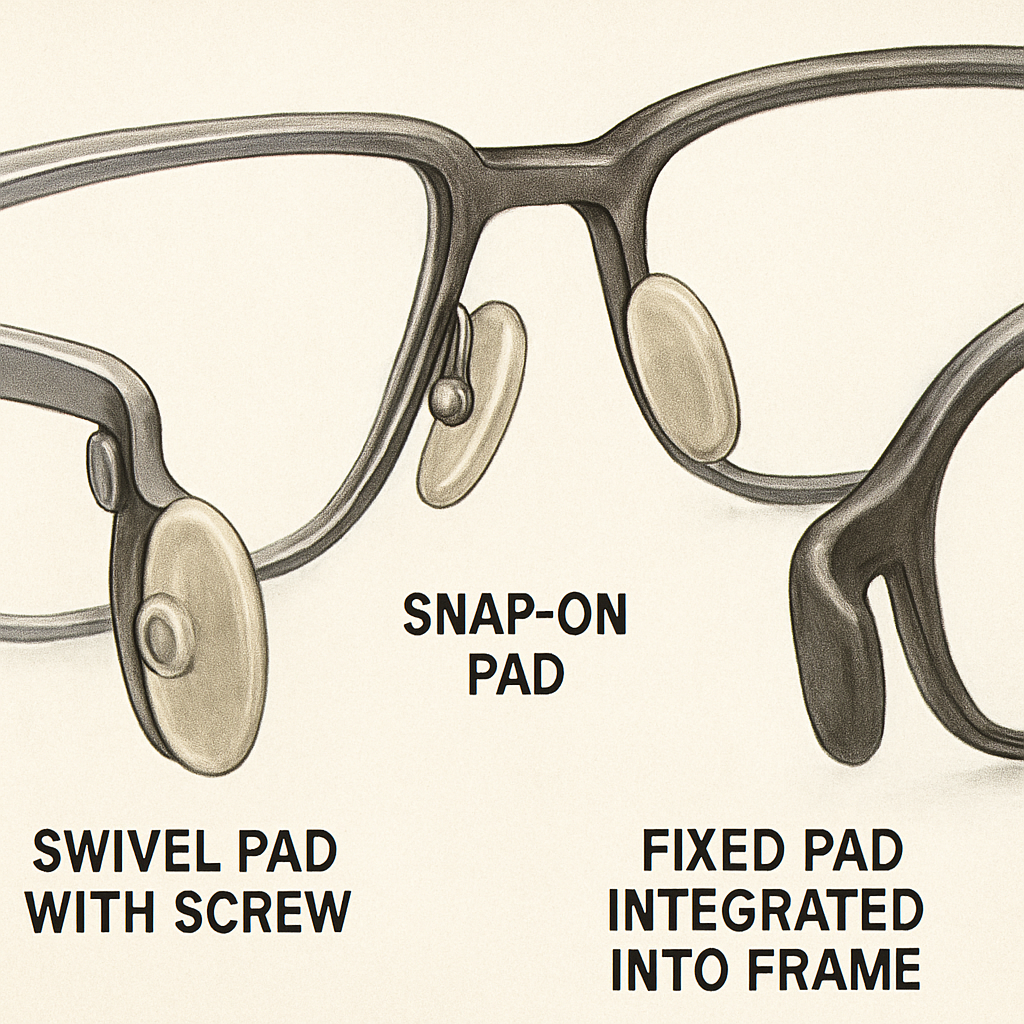
Before you can tweak anything, you’ve got to know what you’re looking at. The tiny cushions under the bridge aren’t all the same – some swivel, some stay put, and a few are glued right onto the frame. Figuring out the type is the first step in learning how to adjust nose pads on glasses.
Grab your glasses and lay them face‑up on a soft cloth. Take a close look at the pads: if you see a little screw or a tiny hole where the pad meets the arm, you’re dealing with a screw‑in (or swivel) pad. These are the most common on metal frames and many modern plastic styles.
If the pad feels like a solid piece of rubber that you can’t see any hardware on, it’s probably a snap‑on or slide‑on pad. Those are usually attached with a little ridge that snaps into a slot on the frame. They don’t have a screw, so you’ll need a different adjustment trick – often just a gentle push or a bit of replacement pad.
And then there are fixed pads. Those are the ones that are molded right into the frame, especially on cheaper full‑rim plastic frames. You won’t see any movement at all, and trying to force them can crack the frame. In those cases, it’s safest to let a pro handle the swap.
So how do you tell the difference in a snap? Here’s a quick visual checklist:
If you’re still unsure, give the pads a tiny nudge with your fingernail. Swivel pads will wiggle a bit, snap‑ons will give a faint click, and fixed pads stay stone‑cold.
Knowing the type not only saves you from a broken screw, it also tells you what tools you’ll need. A mini screwdriver works wonders on swivel pads, while a pair of tweezers can help pop a stuck snap‑on. And if you’ve got a fixed pad, a quick trip to an optical shop (or a call to BuyEyeglass’s support) is the smartest move.
Watch this quick demo that shows the different pad styles in real time:
Now that you can spot the pad type, the actual adjustment becomes a lot less intimidating. As All About Vision notes, most metal frames come with screw‑in pads that you can loosen, angle, then retighten without any special tools. Knowing you have a swivel pad tells you to reach for that tiny screwdriver, while a snap‑on pad signals you’ll just need a gentle push with a fingertip or a pair of tweezers. Either way, you avoid the common mistake of over‑tightening and stripping the tiny screw – a mishap that can turn a simple tweak into a costly repair.
Below is a simple illustration of the three main nose‑pad families – swivel, snap‑on, and fixed – so you can match what you see on your own frames.

With the pad type identified, you’re ready for the next step: loosening the screw just enough to give the pad some freedom. Stay with us, and we’ll walk you through that adjustment without any guesswork.
Now that you know whether your pads swivel, snap‑on, or are fixed, the next question is: what do you actually need in your hand to make the tweak safe and painless?
If your frames have a tiny screw (most swivel pads do), a #00 or #000 flat‑head screwdriver is your best friend. The tip is narrow enough to fit into the little screw head without stripping the thread.
Most new glasses come with a little plastic driver tucked into the case; if yours didn’t, you can pick up a cheap one at any drugstore for under a dollar.
Pro tip: keep a tiny dab of silicone grease on the screw after you’ve tightened it – it adds friction and stops the screw from loosening over time.
Snap‑on pads don’t have a screw, but you’ll still want a tool that can give you a little leverage without scratching the lens.
Fine‑point needle‑nosed tweezers let you pop the pad out of its groove and reposition it gently. If the pad is stuck, a light twist with the tweezers usually frees it.
And if you’re worried about crushing the pad, choose tweezers with a rubberized grip – they’re cheap and they protect the silicone.
For the ultimate control, especially on thicker frames or when you need to bend the pad arm, a dedicated nose‑pad adjusting plier does the trick. Western Optical describes a model with ultra‑thin jaws that slip between the lens and the pad, one jaw cradling the pad and the other bracing the arm .
These pliers come in a few grip styles – foam, vinyl, or polished steel – so you can pick the one that feels comfortable in your hand. The slim jaws let you reposition the pad without risking damage to the frame.
Imagine you’re adjusting a pair of kids’ sunglasses that have a bulkier arm; the plier’s slotted jaw holds the arm steady while the other jaw nudges the pad into the perfect spot.
A clean, soft microfiber cloth protects the lenses while you work. A magnifying glass or a phone’s camera zoom can help you see that tiny screw clearly.
A small container for spare silicone pads is handy – they’re cheap, and having a spare means you won’t be stuck if a pad tears.
Lastly, a pair of safety glasses (yes, even for a tiny adjustment) keeps any accidental screw fragments away from your eyes.
Does this feel like a lot? Not really – once you have the right tools within arm’s reach, the whole process takes under five minutes.
In our experience at BuyEyeglass, customers who keep a mini screwdriver and a pair of tweezers in their glasses case report far fewer trips back to the shop for “slipping glasses.” It’s a tiny habit that pays off big time.
So, grab your tools, set up a clean workspace, and get ready for the next step: actually loosening that screw and finding the perfect angle.
Now that you’ve got the right screwdriver or tweezers in hand, it’s time to actually move the pads into place.
First, sit at a clean table and lay your glasses on a soft microfiber cloth, lens side up. The cloth protects the lenses from accidental scratches while you’re fiddling with the tiny hardware.
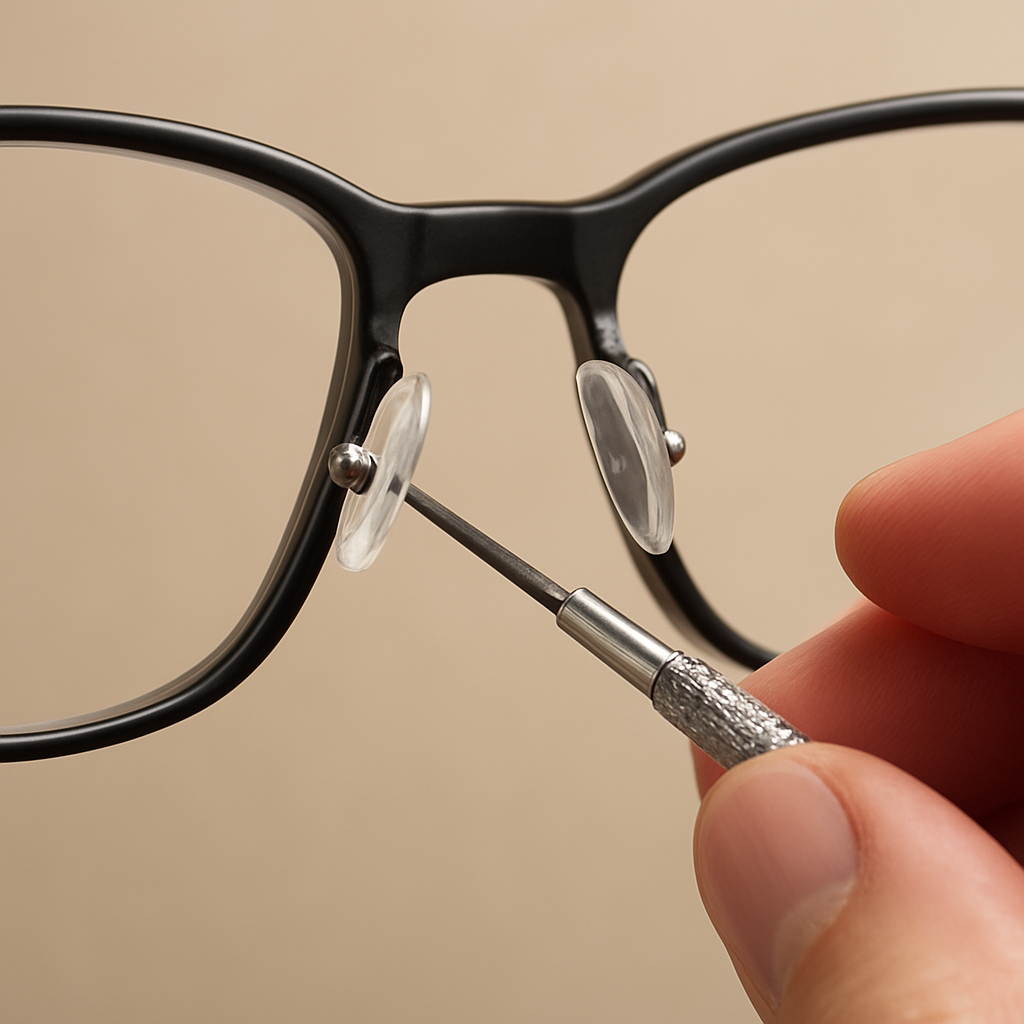
Take a deep breath and look at the screw that holds a swivel pad. If you see a small notch, that’s your entry point. Gently insert the tip of the #00 flat‑head screwdriver and turn it counter‑clockwise just a quarter turn. You should feel a tiny give – that’s the pad loosening enough to slide.
What if the screw feels stubborn? Don’t force it. Instead, pause, wipe away any dust with a cotton swab, and try again. A little extra friction can make the thread slip, but overtightening will strip the head and leave you with a costly repair.
With the screw slightly loose, use the tip of the screwdriver or a pair of needle‑nosed tweezers to nudge the pad. Imagine you’re guiding a tiny boat into a dock: small pushes, not jerks. Move the pad up or down until the lenses sit parallel to your face when you look straight ahead.
Here’s a real‑world example: a colleague of ours who works long hours at a computer noticed the left side of his frames constantly sliding down. By raising the left pad just 1 mm, the weight balanced and the slipping stopped. That tiny adjustment made a huge difference in comfort during marathon Zoom calls.
Another scenario: a parent adjusting kids’ sunglasses. Children’s noses are flatter, so the pads often need to tilt outward a bit. A gentle outward push on each pad prevents the frames from pinching the cheekbones, which can cause kids to keep taking the glasses off.
Once the pads feel right, tighten the screw clockwise just enough to hold the new angle. You want a snug click but not a bone‑crushing torque. A good test is to give the pad a light wiggle – if it still moves, you haven’t tightened enough.
Put the glasses on and do a quick head‑shake test. If the pads stay where you placed them and the lenses stay level, you’ve nailed it. If you feel a slight shift, loosen the screw a fraction more and repeat the nudge.
Pro tip: keep a dab of silicone grease on the screw after you finish. The grease adds friction, reduces future loosening, and doesn’t damage the metal. It’s a tiny habit that can keep your pads stable for months.
For snap‑on pads, the process is similar but without the screw. Grip the edge of the pad with tweezers, pull it gently out of its groove, reposition, and snap it back in. If the pad resists, a tiny twist of the tweezers usually releases the tension.
And what about fixed pads? Those are molded into the frame, so you’ll need to replace them entirely if they’re worn. In that case, swapping the whole pad set is the safest route – a quick job for any optical shop.
Does this feel like a lot of steps? In reality, once you’ve done it a couple of times it takes under five minutes. The key is patience, a steady hand, and the right tools.
Remember, the goal isn’t just to stop slipping; it’s to create a balanced fit that lets you wear your glasses all day without pressure points. A well‑adjusted nose pad reduces strain on the hinges, which can extend the life of the frames by up to 30 % according to some optical technicians.
In our experience at BuyEyeglass, customers who follow this simple routine report far fewer trips back to the store for “nose‑pad adjustments.” It’s a small habit that saves time, money, and a lot of frustration.
So, grab your screwdriver, make those micro‑adjustments, and enjoy a clear, comfortable view – you’ve just mastered how to adjust nose pads on glasses.
Alright, you’ve just nudged those pads into place – now it’s time to see if they actually stay where you left them. Ever put on a pair of glasses, walk a few steps, and feel them slide right back down? That’s the moment we’re trying to avoid.
First, slip the glasses on and sit upright. Look straight ahead; the lenses should be parallel to your face, not tilting up or down. Gently shake your head side‑to‑side. Do the pads wobble? If they do, you probably need a tiny bit more tension on the screw.
Next, press the pads lightly with your fingertip. They should feel snug but not rigid – a little give means they’ll adapt as you move. If you hear a click, that’s the screw tightening enough to hold the angle.
Take a moment to notice any pressure points. Is there a red mark on the bridge after a minute? If yes, the pads might still be too low or too tight.
Here’s where the real magic happens: a micro‑adjustment of 0.5 mm can make a world of difference. Grab your screwdriver again, turn the screw just a quarter‑turn clockwise if the pad is still shifting, or counter‑clockwise if it feels pinched.
Don’t over‑tighten. Imagine trying to close a jar with too much force – you’ll end up stripping the thread. A gentle “click” is all you need.
If you have snap‑on pads, use a pair of needle‑nosed tweezers to press the pad back into its groove after a slight bend. A tiny twist of the tweezers often releases any tension that’s keeping the pad from seating properly.
Pro tip: after you’re happy with the position, dab a dab of silicone grease on the screw. It adds friction and keeps the pad from loosening over weeks of daily wear.
Even the best‑adjusted glasses can drift after a few days of use. Keep an eye out for these tell‑tale signs: the glasses slip when you smile, the lenses tilt when you look down, or you develop a sore spot on the nose bridge.
If any of those happen, repeat the fit check. It’s normal to need two or three rounds of fine‑tuning before the pads settle into their perfect spot.
And remember, a well‑balanced fit does more than just keep your glasses on – it reduces stress on the hinges, which can extend the life of the frames by months.
| Check Item | Tool Needed | What to Look For |
|---|---|---|
| Pad wobble | Mini screwdriver or tweezers | Pads should stay still when you shake your head |
| Pressure points | None (just your finger) | No red marks after 1‑2 minutes of wear |
| Screw tension | Mini screwdriver | Click feel, no stripped threads, easy to turn a quarter turn |
So, what’s the next step? Put the glasses on, walk around the room, and give them a mini‑test drive. If they feel solid, you’ve nailed the fit. If not, just repeat the tiny tweak – it’s that simple. In our experience at BuyEyeglass, most folks get it right after two quick checks, and the rest of the day feels like a breeze.
Take a breath, give yourself a small celebration – you’ve just turned a potential annoyance into a confidence boost. Now you can enjoy clear vision and comfortable wear, no trips back to the shop required.
Even after a perfect tweak, glasses love to throw little surprises your way. You might notice a pad wobbling, a screw that won’t stay tight, or a lingering pressure point on your nose bridge. Let’s walk through the most common gremlins and what you can do about each.
When the pad feels like it’s about to fall off the frame, the screw is probably still a hair too loose. Grab your mini screwdriver and turn the screw clockwise just a quarter‑turn. You’ll feel a gentle click and the pad should stop moving.
Still a bit shaky? A dab of silicone grease on the thread can add friction and keep the screw from loosening again. It’s a tiny habit that makes a big difference.
Turn the screw too far and you’ll either strip the tiny head or crush the pad’s mounting arm. The pad will feel rigid and may even crack under pressure. If that happens, back the screw out a half‑turn and then re‑tighten just enough to hold the pad without any play.
Need a rescue kit? A compact eyeglass repair kit includes the precise #00 flat‑head screwdriver and a set of replacement pads, so you’re never stuck without the right tool.
If one lens looks higher than the other, one pad is probably sitting too low or too high. Loosen the screw just enough to let the pad slide, then nudge it a millimeter up or down. Test the view by looking straight ahead – the lenses should be parallel to your face.
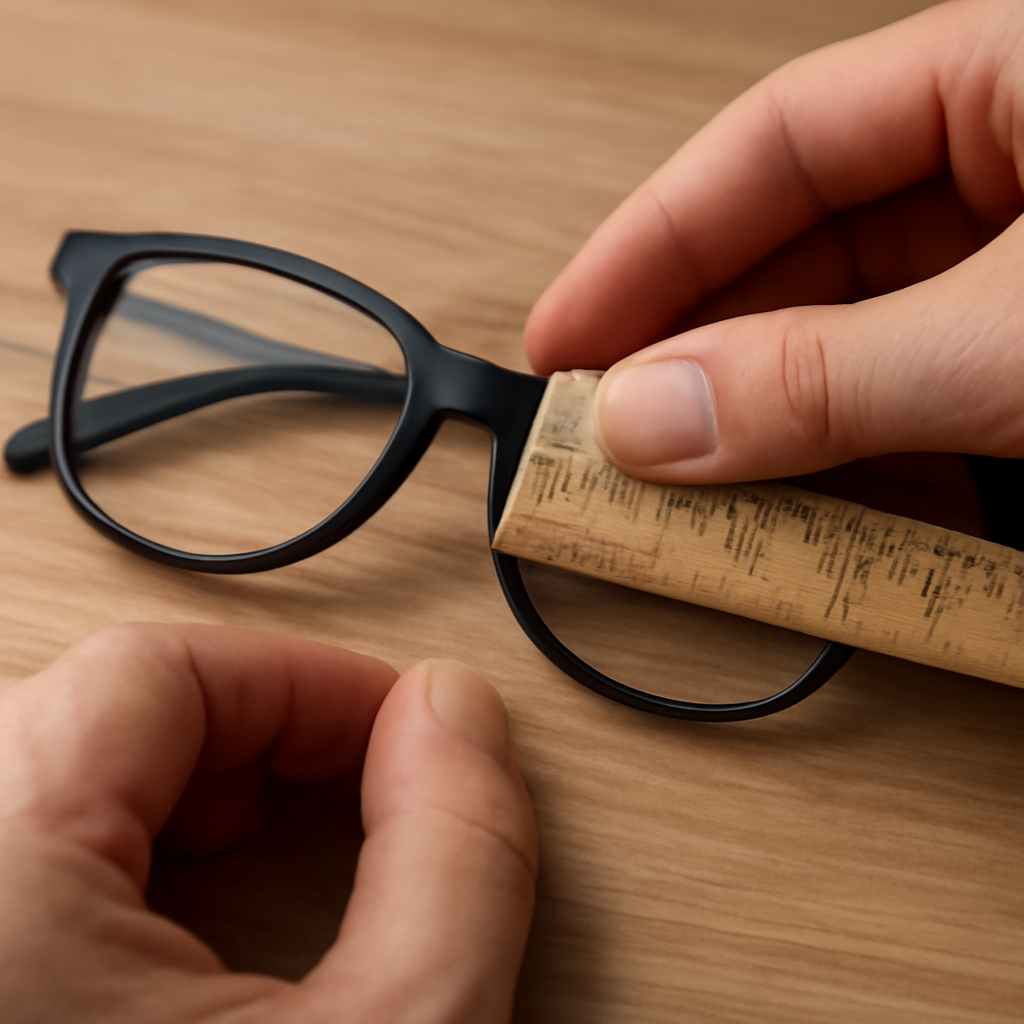
Pro tip: use a ruler or the edge of a credit card to gauge the distance between the pad and the bridge. A difference of even 0.5 mm can be the source of that tilt.
Silicone pads can flatten or split after months of wear. When you feel a hard edge or see a tear, swap them out. Most repair kits ship with a few spare pads that snap right into place.
If you’re dealing with a snap‑on style, gently pull the old pad with tweezers, align the new one in the groove, and give it a satisfying click.
A stripped head looks smooth and turns without any resistance. In that case, you’ll need a replacement screw – many kits include an assortment of tiny screws for exactly this scenario.
Lost screws are a common annoyance, especially when you’re working on a tiny frame. Keep a small pill container in your glasses case to store any extras you find.
So, what should you do if a problem persists after these tweaks? Give the whole fit a fresh test: put the glasses on, walk around, and shake your head. If anything still feels off, repeat the relevant step. A second round of tiny adjustments is normal and often lands you with a truly comfortable fit.
Remember, the goal isn’t just to stop slipping; it’s to create a balanced, pressure‑free wear that lets you forget you’re even wearing glasses. With these quick fixes in your toolkit, you’ll spend less time fussing and more time enjoying clear vision.
We’ve walked through loosening screws, nudging pads, and testing the fit. Most of the time those DIY tweaks solve the problem, but there are moments when a little extra expertise saves you from a broken frame or endless frustration.
If you turn the tiny screw and it just spins without biting, the head is stripped. A stripped screw can’t hold a pad, and forcing it will damage the surrounding metal. At that point, a professional can replace the screw with the correct #00 or #000 size and ensure the thread is clean. World Optic’s technicians specialize in these micro‑repairs and can even provide titanium‑grade replacements that are both lightweight and hypoallergenic.
Silicone pads can flatten, split, or develop a hard edge after months of wear. When you feel a gritty bump on the bridge, no amount of tightening will help. A pro will remove the old pad, check the mounting arm for cracks, and install a fresh pad that matches the frame’s curvature. This is especially important for plastic frames that don’t have a screw – they often need a snap‑on pad replacement that only a trained hand can do without cracking the lens.
Some budget-friendly frames have pads molded directly into the bridge. You can’t unscrew or pop those out, and trying to pry them apart usually snaps the frame. If the bridge feels uncomfortable, the only safe route is to have an optical shop fabricate a custom silicone insert or convert the frame to a swivel‑pad system. That kind of modification requires precision tools and expertise you won’t find in a kitchen drawer.
Even after you’ve aligned the pads, you might notice one lens tilting or the view looking slightly off‑center. That can be a sign of a bent frame arm, a warped bridge, or an improperly seated lens. A professional will check the frame geometry, re‑center the lenses, and if needed, adjust the nose‑pad arms using a pressure‑fuse technique that leaves virtually no visible seam.
Kids, athletes, or people with long eyelashes often need extra clearance or more flexible pads. World Optic offers adjustable nose‑pad arms made of titanium that slide along the bridge, giving you a custom fit without permanent drilling. Those inserts are a perfect solution when standard pads just won’t cooperate.
If you answered “yes” to any of those items, it’s time to schedule a repair. Most optical shops, including the experts at World Optic, can turn a problematic pair into a comfortable, long‑lasting set within a day.
Look for a shop that mentions micro‑tool adjustments or titanium‑grade nose‑pad inserts – those keywords indicate they have the right equipment. Ask if they offer a warranty on the repair; a one‑year guarantee is a good benchmark.
Bottom line: you can handle the majority of nose‑pad tweaks at home, but when the hardware is damaged, the pad is integrated, or you need a custom solution, handing the job off to a qualified technician protects your investment and keeps your vision crystal clear.
If the pads feel loose enough to wiggle, leave red marks on your bridge, or cause the lenses to tilt when you look straight ahead, they probably need a tweak. A quick test is to wear the glasses, move your head side‑to‑side, and notice any slipping or pressure points. Those signs tell you the pads are either too high, too low, or not secured enough.
You’ll need a tiny flat‑head screwdriver (size #00 or #000 works best), a pair of needle‑nosed tweezers for snap‑on pads, and a soft microfiber cloth to protect the lenses. A small piece of silicone grease can add friction to the screw after you finish. All of these items are cheap, often already in an eyeglass case, and fit comfortably in a pocket.
Start by turning the screw counter‑clockwise just a quarter turn – you should feel a slight give. If it resists, wipe away dust and try again gently; never force it. When tightening, turn clockwise the same amount, listening for a soft click. The goal is a snug hold, not a bone‑crushing torque. A dab of silicone grease afterward helps keep the screw from loosening later.
Snap‑on pads don’t have a screw, so use needle‑nosed tweezers to gently pull the pad out of its groove. Once it’s free, reposition it a millimeter up or down, then press it back until you hear a firm snap. If the pad sticks, a tiny twist of the tweezers usually releases the tension. Avoid excessive force to keep the silicone from tearing.
First, re‑check the pad angle – a 0.5 mm shift can make a big difference. Make sure the screw is tightened enough to hold the new position but not overtightened. If the frames are heavy or the bridge is narrow, consider adding a thin silicone spacer behind the pad for extra grip. In many cases, a second micro‑adjustment fixes the slip.
Give your pads a quick visual check every month, especially if you wear glasses daily. Look for cracks, flattening, or loosened screws. A simple “wiggle test” – gently tug the pad – will reveal any looseness. Regular checks catch problems early, preventing pressure marks and extending the life of both the pads and the frame.
If the screw is stripped, missing, or the pad itself is cracked, a pro can replace the hardware without damaging the frame. Fixed or integrated pads that can’t be unscrewed also need a technician’s custom insert. In our experience at BuyEyeglass, a quick visit to an optical shop saves time and avoids costly frame repairs when the DIY route hits a wall.
We’ve walked through every step of how to adjust nose pads on glasses, from spotting the pad type to tightening that tiny screw without stripping it. By now you know that a quarter‑turn, a dab of silicone grease, and a quick wiggle test can turn a slipping pair into a day‑long comfort zone.
So, what’s the next move? Grab your mini screwdriver, give each pad a gentle nudge, and test the fit with a side‑to‑side head shake. If anything feels off, remember the 0.5 mm micro‑adjustment rule – a tiny shift can make a world of difference.
In our experience at BuyEyeglass, most customers nail the perfect fit after one or two quick rounds of fine‑tuning. That means fewer trips to the shop, less money spent on replacements, and more time enjoying clear vision.
And if you ever hit a snag – a stripped screw, a cracked pad, or a fixed‑pad frame – don’t hesitate to let a professional handle it. A quick visit can save the frame and keep your glasses looking like new.
Take a moment now to celebrate the small win. You’ve just turned a frustrating problem into a simple, repeatable habit. Keep your tools handy, check your pads monthly, and you’ll stay one step ahead of any future slip‑ups.