Ever stared at a tiny ruler and wondered if you could actually get your pupillary distance right without stepping into an optician’s office?
You’re not alone—most of us have felt that mix of curiosity and frustration when ordering glasses online.
The good news is that measuring PD at home is easier than you think, and a few minutes with a mirror or smartphone can save you a pricey return.
In our experience at BuyEyeglass, customers who double‑check their PD before checkout report far fewer adjustments and end up loving their new frames right away.
So, how do you actually do it? Let’s break it down into three simple methods you can try tonight, whether you’re tech‑savvy or prefer old‑school tools.
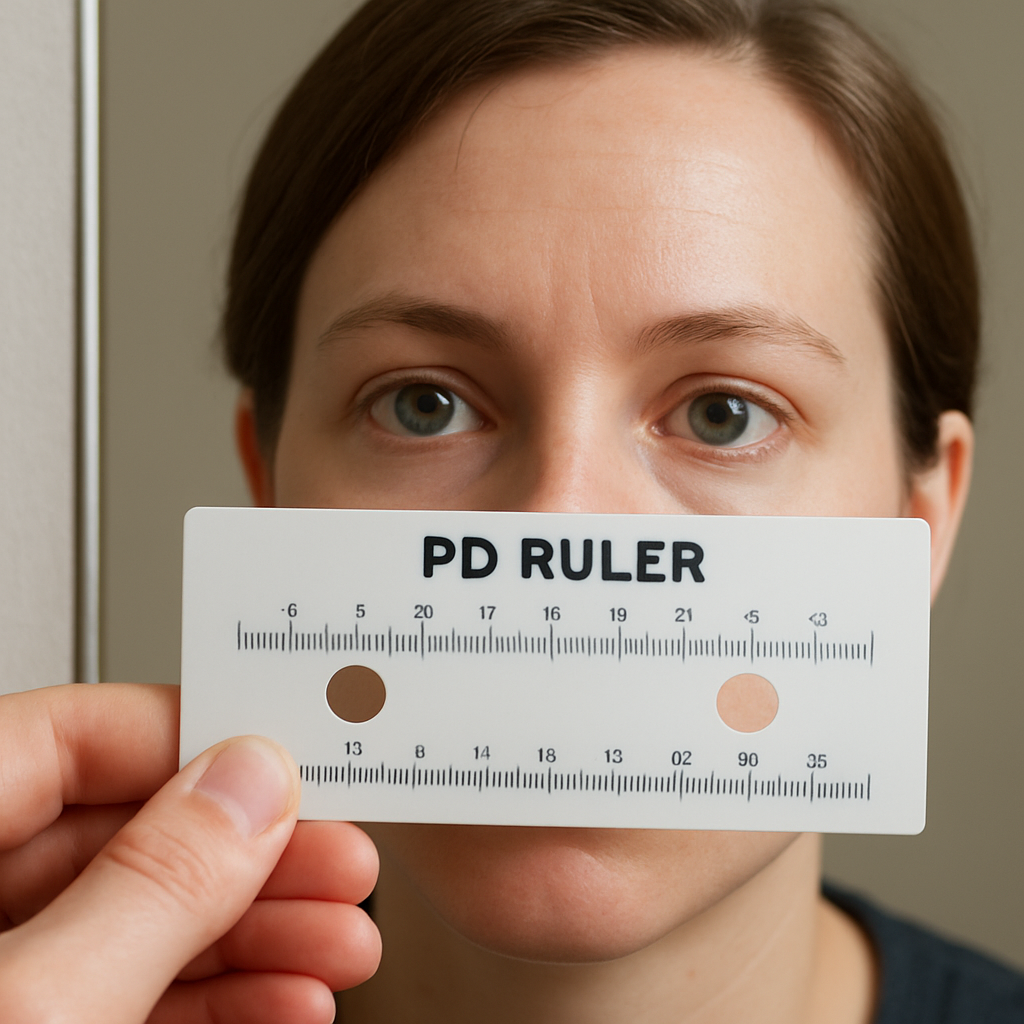
Method one uses a ruler and a mirror. Place the ruler horizontally across the bridge of your nose, line up the zero mark with the center of one pupil, and then note the millimeter measurement that lines up with the other pupil.
If you don’t have a ruler that’s small enough, grab a credit‑card‑sized piece of paper, draw a tiny line at the edge, and hold it up to your eye while you measure with the ruler—just make sure the paper stays flat.
Method two leans on your phone’s camera. Most smartphones let you take a photo of yourself using the front‑facing lens, then you can zoom in and use the on‑screen ruler feature—or a simple app—to measure the distance between the dark centers of your irises.
Don’t worry if the number looks a bit off the first few tries—just take three measurements and average them. Consistency is key, and a tiny variance of a millimeter rarely impacts how the lenses sit on your face.
Once you have your PD, plug it into the order form on our site and you’ll see it automatically populate the lens settings, keeping your prescription spot‑on.
What if you still feel unsure? Grab a friend to help hold the ruler steady while you focus on a distant point—this two‑person technique often yields the most reliable reading.
Ready to give it a shot? Take a deep breath, follow one of these methods, and you’ll be one step closer to glasses that fit like they were made just for you.
Measuring your pupillary distance at home is quick, cheap, and surprisingly accurate when you follow a simple three‑step routine with a ruler, a mirror, or your phone’s camera.
Just take three readings, average them, and pop the number into BuyEyeglass’s order form so your new glasses fit perfectly without a costly return.
Before you even think about lining up a ruler, take a quick inventory of what you already have on the kitchen counter or bathroom shelf.
All you really need are three humble items: a millimetre‑marked ruler (the kind you use for school projects), a flat mirror, and a bright light source – a lamp, a phone flashlight, or even a sunny window.
If your ruler feels a bit long, don’t panic. Cut a small strip with scissors, or simply fold the end so the zero mark stays visible. The key is that the scale you read is in millimetres, because PD is measured that way.
A mirror that’s at least 12‑inch wide works best. You want enough surface to see both eyes without having to tilt your head too much. A bathroom vanity mirror or a compact hand‑mirror does the trick.
Lighting matters more than you might think. Shadows can make the dark centre of the pupil look fuzzy, leading to an off‑by‑one‑millimetre error. Position a lamp behind you and face the mirror, or turn on the overhead light and sit near a window.
Now grab a piece of plain paper and a pen. We’ll use it to jot down the three readings you’ll take, then calculate the average. Having a small notebook handy keeps everything tidy and prevents you from losing track.
Here’s a quick sanity check before you start: hold the ruler against your brow, line the zero up with the centre of your right pupil, and note the millimetre mark that lines up with the left pupil’s centre. If the number looks wildly different from the average adult range (around 55‑70 mm), you probably have the ruler tilted or the mirror angled wrong. Adjust and try again.
Tip: many people find it easier to measure one eye at a time. Place the ruler horizontally across the bridge, zero at the inner edge of the right pupil, then note the millimetre mark that lines up with the left pupil’s centre. Write it down, then repeat a couple of times.
When you’ve got a comfortable setup, it’s time for the first actual measurement. Sit upright, look straight ahead at a distant point (like a picture on the wall), and keep your eyes relaxed. The mirror should reflect both eyes clearly.
The short clip above walks you through the exact hand‑position you need – ruler in one hand, mirror steady with the other – so you can see the process in real time. Pause, rewind, and match the steps to your own reflection.
If you hit a snag, remember there’s a wealth of free advice online. For instance, eye health tips from Dr. Dubey include a simple diagram showing where to align the zero mark, which can clear up any lingering confusion.
When the ruler feels steady, note the number, then shift the ruler slightly and measure again. Consistency across three attempts is the sign you’re on the right track. If one reading deviates by more than a millimetre, discard it and redo that trial.
Finally, gather your three numbers and calculate the mean. You can do this mentally: add them together and divide by three. Write the final PD next to your prescription details – you’ll need it when you fill out the order form on BuyEyeglass.
A quick double‑check: look at the average you just calculated. Does it sit comfortably within the typical adult range? If you’re under 50 mm or over 75 mm, it might be worth asking a friend to help or using the phone‑camera method as a backup.
That’s it for step one. With just a ruler, a mirror, and a little patience, you’ve assembled the toolkit that lets you measure pupillary distance at home without a trip to the optometrist. In the next step we’ll show you how to actually take the measurement and avoid common pitfalls.
Now that your ruler, mirror, and lighting are ready, the next trick is getting yourself in the right spot. Think of it like setting up a selfie – you want the angle just right so the whole face is in frame, but you also need the ruler to sit flat and level.
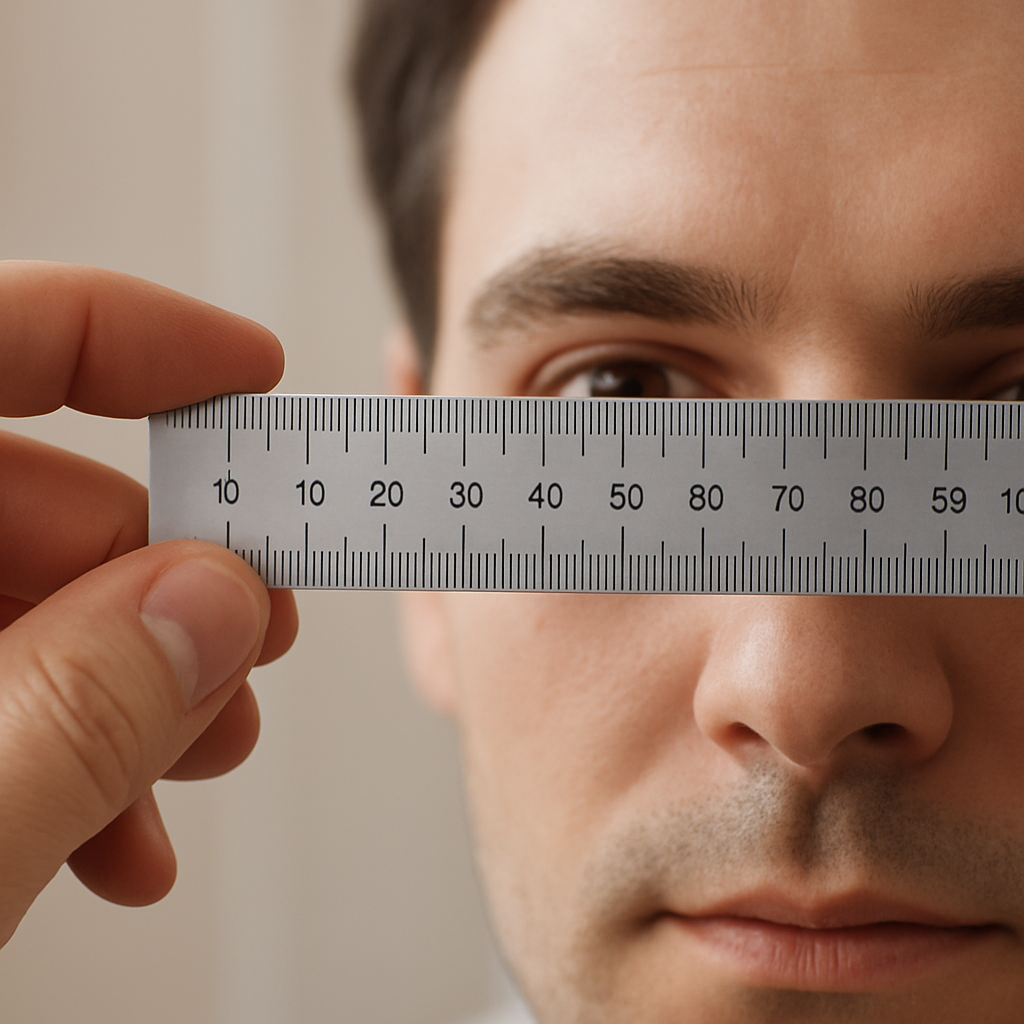
First, stand about 8 inches (20 cm) away from the mirror. That distance gives your eyes a natural line of sight and keeps the ruler from looking like it’s floating.
Why 8 inches? The expert guide from Kings Highway Vision Center points out that a short distance reduces parallax error – the tiny shift you get when the ruler isn’t perfectly aligned with your eyes.
Place the ruler horizontally across the bridge of your nose. The key is keeping it perfectly level; even a slight tilt can add a millimeter or two to your reading.
Here’s a quick trick: use a small piece of tape on the zero mark. When you press the ruler against your nose, the tape sticks, giving you a visual anchor that won’t slide.
Next, check the ruler’s orientation by looking at the reflection. If the top edge of the ruler appears slightly higher on one side of the mirror, adjust until it looks straight.
While you hold the ruler, pick a distant object – maybe a picture on the wall or the window outside – and stare at it. Your eyes will naturally align with the center of each pupil, making the measurement more reliable.
Don’t be tempted to glance at the ruler itself; that tiny movement can throw off the center of your pupils.
Close your right eye, line the zero mark up with the center of your left pupil, and note the millimeter where the right pupil falls. Then, without moving the ruler, close the left eye and open the right. Record the new number. The difference between those two numbers is your PD.
It feels a bit like a game of “peek‑a‑boo” with your own eyes, but that’s the point – you’re letting each eye take the spotlight for a second.
Repeat the whole process three times. Write each result down – you’ll likely see a pattern like 62 mm, 63 mm, 62 mm. Average those numbers for your final PD.
If the numbers jump around wildly, pause, straighten up, and try again. A steady hand and a calm mind make a big difference.
Imagine you’re ordering a new pair of Ray‑Ban RB6518 sunglasses from BuyEyeglass. You measured 64 mm, but the second reading came out at 66 mm. Averaging gives you 65 mm – the sweet spot that keeps the lenses centered, preventing the “tunnel vision” feeling that can happen with a mis‑aligned frame.
Another scenario: a friend of yours, who wears progressive lenses, noticed eye strain after a week of wearing new glasses. After re‑checking, she discovered her PD was off by 2 mm. Correcting it solved the problem instantly. Small errors matter, especially with multifocal lenses.
Did you know the average adult PD hovers around 63 mm? The Cleveland Clinic cites a typical range of 50 mm to 70 mm, so a reading in the low‑60s is pretty normal.
Feeling confident? Great. If you’re still unsure, ask a family member to hold the ruler steady while you focus – the extra set of hands often eliminates that tiny wobble.
With your position nailed down, you’re ready for the next step: averaging your measurements and entering the PD into the BuyEyeglass order form. Trust the process, and you’ll soon have glasses that sit like they were made just for you.
Now that your ruler is steady and you’ve positioned yourself correctly, it’s time to actually read the distance – that’s the heart of the Ruler Method.
Close your right eye and look straight ahead at a distant point (a picture on the wall, a window, anything beyond a few feet). With the ruler pressed lightly against the bridge of your nose, slide the zero‑millimeter mark until it lines up with the dark centre of your left pupil. It should feel like the ruler is “hugging” the bridge, not pressing hard.
Don’t rush. If the zero mark drifts, the whole measurement will be off by a millimeter or two – and that’s enough to make progressive lenses feel “off‑center.”
Keeping the ruler exactly where it is, open your right eye and close your left. The number that lines up with the centre of the right pupil is your raw PD reading. Write it down immediately; the numbers can blur together if you wait.
Tip: Use a piece of tape on the zero mark (you probably already did this in Step 2). The tape gives you a visual anchor so the ruler won’t slip when you switch eyes.
Close the right eye again, reopen the left, and repeat the alignment process. You should end up with a second number that’s either identical or within a millimetre of the first. If you’re seeing a 4‑mm gap, something’s tilted – pause, reset, and try again.
Why the swap matters: each eye has its own centre, and a tiny asymmetry (called “monocular PD”) can matter for high‑prescription or multifocal lenses. Recording both numbers lets you feed the exact values into the BuyEyeglass order form.
Do the whole close‑eye‑swap routine three times in a row. Most people get a pattern like 62 mm, 63 mm, 62 mm. Add the three numbers together and divide by three – that’s your final PD.
If the three readings are scattered (e.g., 60 mm, 66 mm, 62 mm), it’s a sign your ruler isn’t level or you’re shifting your head. Reset, maybe ask a friend to hold the ruler, and go again.
Imagine you’re ordering the classic Ray‑Ban RB6518 from BuyEyeglass. Your first reading is 64 mm, the second 66 mm, and the third 65 mm. The average lands at 65 mm – a sweet spot that keeps the lenses centered and prevents the “tunnel vision” feeling many progressive‑lens wearers report.
Another scenario: a coworker measured 58 mm for a pair of reading glasses and felt eye strain after a week. When they re‑measured with the Ruler Method, the true value was 60 mm. Updating the PD on the next order eliminated the strain instantly.
• Use a ruler with clear, un‑worn millimetre markings. A faded scale can add half a millimetre of error without you noticing.
• Keep your head still. Rest your chin on a low table or hold a light‑weight book against your forehead – anything that reduces micro‑movements.
• Do the measurement at the same time of day you’ll wear the glasses. Pupil size can shift with lighting, and a consistent environment yields the most repeatable result.
• If you have a partner around, let them double‑check the level of the ruler in the mirror. A second pair of eyes often catches a tilt you miss.
That’s it. The Ruler Method might feel a bit like a science experiment you do in pajamas, but the payoff is real: glasses that sit perfectly, no extra strain, and a smoother checkout on BuyEyeglass.
Need a visual walk‑through? Check out this step‑by‑step video guide for a quick sanity check, or read the detailed guide from Mega Vision on why accurate PD matters for comfort.
Now that you’ve taken a few readings with the ruler, you might be wondering which method will give you the most reliable PD for your new frames.
Should you stick with the old‑school ruler, or does a smartphone app actually save you time without sacrificing accuracy?
The ruler method gives you a physical reference you can see directly in the mirror. Because the scale is printed on the same piece of plastic, there’s no risk of software mis‑calibration.
It also works everywhere – no need for Wi‑Fi, a charged battery, or a specific operating system. If you’ve got a clear millimetre ruler and a decent light, you’re good to go.
One downside is that the ruler can shift if your hand trembles or if the bridge of your nose isn’t perfectly flat against it. Small tilts add a millimetre or two, which matters most for progressive or high‑prescription lenses.
Most apps overlay a digital ruler onto a selfie, letting you line up the centre of each pupil with a bright line. The software often includes a “zoom‑to‑pixel” feature, so you can measure down to the half‑millimetre.
Because the app calculates the distance based on the camera’s field of view, you don’t have to hold a ruler steady – your phone does the heavy lifting. That can feel less intimidating for folks who hate the idea of a ruler touching their nose.
But the trade‑off is reliance on the phone’s camera quality and the app’s calibration. Low‑resolution front cameras, glare from the screen, or an app that assumes a default phone model can skew the result.
And let’s be honest: not every free app is trustworthy. Some pop‑up ads or in‑app purchases can distract you, and you’ll still need a well‑lit environment to see the irises clearly.
Ask yourself these three questions before you pick a method:
If you answered “yes” to the first two and you’re ordering single‑vision frames, the ruler is usually faster and just as accurate. If you’re dealing with multifocals or you prefer a hands‑free approach, give a reputable app a try – but double‑check the result with the ruler if you can.
Here’s a concise table that sums up the main factors you’ll weigh when deciding between the two.
| Feature | Ruler Method | Smartphone App |
|---|---|---|
| Equipment needed | Simple millimetre ruler, mirror, good lighting | Smartphone with front camera, downloadable app |
| Accuracy range | ±1 mm when held steady | ±0.5 mm on high‑res phones, varies otherwise |
| Ease of use | Hands‑on, tactile feedback | Touchscreen, no physical ruler required |
| Potential errors | Tilt, hand tremor, parallax | Camera calibration, low‑light glare, app bugs |
| Best for | Single‑vision, quick check, low‑tech settings | Progressive lenses, tech‑savvy users, on‑the‑go |
Take a minute to glance at the table. Notice how the ruler shines in low‑tech scenarios, while the app can edge out on precision if you have a good phone.
Before you trust any app reading, spend a quick minute calibrating it. Open the app’s settings, enter the exact length of a standard 30 mm ruler segment, and let the software adjust its scale. This step cuts out a common source of error where the app assumes a default phone model.
Lighting plays a silent but huge role, too. Whether you’re using a ruler or a phone, glare on the glasses or shadows on the mirror can hide the true centre of your pupils. A soft, diffused lamp or natural daylight from a window usually gives the cleanest view.
In practice, many of our customers end up using a hybrid approach: they snap a quick app measurement, then verify it with a ruler before entering the number on the BuyEyeglass order form. That extra sanity check eliminates the occasional “off‑by‑a‑millimetre” surprise.
One last trick: after you’ve noted both measurements, write them down side by side and take the average. Even if one method is off by a millimetre, averaging smooths the discrepancy and leaves you with a reliable PD for any prescription.
So, what’s the next step? Grab your ruler, fire up a trusted PD app, and record both numbers. Compare them, average if they differ, and you’ll have a solid PD ready for any frame – even the sleek Ray‑Ban RB6518 that we stock.
Alright, you’ve just taken a couple of readings with the ruler and maybe even a quick app. Now comes the part most people skip: actually making sure those numbers are solid before you type them into the order form.
Why does this matter? A single millimetre off can make a high‑prescription pair feel like you’re looking through a tiny window that’s slightly to the side. It’s the difference between “these glasses feel right” and “why does everything feel a little blurry?”
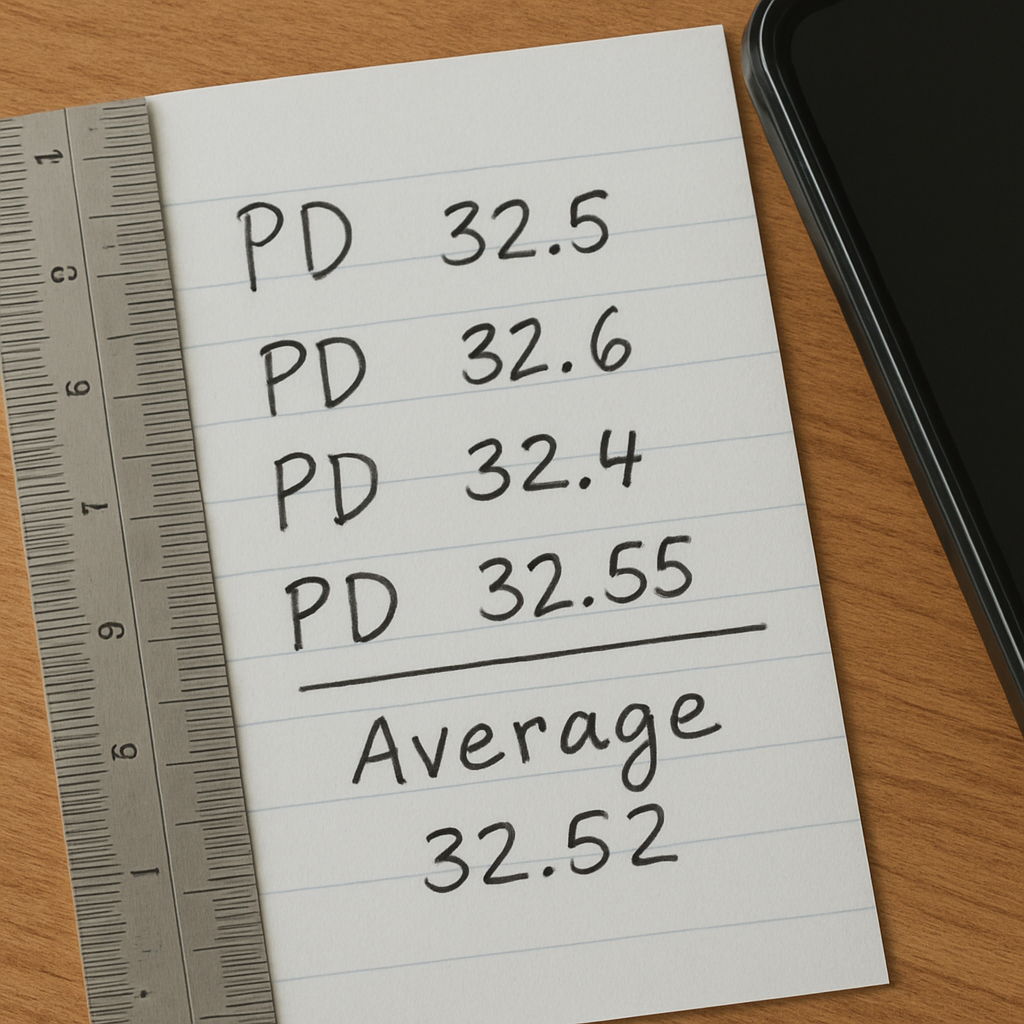
Write down each measurement you captured. If you did three ruler readings and two app readings, you should have five numbers sitting in front of you. Don’t trust your memory – write them down immediately.
Example:
Seeing them side‑by‑side makes patterns pop out.
If one of those numbers jumps out – say you have a 58 mm reading sandwiched between 62‑63 mm – give it a second look. Maybe the ruler tilted or the app mis‑calibrated. Re‑measure just that one quickly; it’s faster than starting over.
In our experience, the biggest culprit is a slip on the bridge of the nose. A tiny wobble adds a millimetre or two, and it’s easy to miss when you’re focused on the mirror.
Take the numbers that feel consistent and add them together, then divide by the count. Using the example above (ignoring the 58 mm outlier), you’d add 62 + 63 + 62 + 64 + 65 = 316, then divide by 5, landing you at a tidy 63.2 mm. Round to the nearest whole number unless your lens lab asks for decimals – most online retailers accept whole numbers.
Why average? Think of it like smoothing out a bumpy road. Even if one method was a hair off, the average gives you a reliable middle ground.
Sometimes another set of eyes catches what yours missed. Hand the ruler to a partner, have them line up the zero mark while you focus on a distant object. Let them read the number aloud. If their reading matches yours, you’ve got a solid confirmation.
Even a quick “hey, does that look right?” from a friend can boost confidence, especially before you order pricey progressive lenses.
When you head to the BuyEyeglass checkout, you’ll see a field labelled “PD” on the order form. Paste the average you calculated right there. If you measured a dual PD (separate values for each eye), enter them exactly as “32 mm / 31 mm” – the slash tells the system you have a binocular reading.
Pro tip: keep a tiny notebook on your nightstand for future reference. Your PD doesn’t change much after adulthood, so you’ll never have to re‑measure unless you notice a big shift in vision.
Need a visual reminder of what the PD field looks like? Check out the step‑by‑step guide from Eyebuydirect – it walks you through the exact spot on their form where the number belongs.
And if you’re still on the fence about whether your reading is spot‑on, imagine this scenario: you order a sleek Ray‑Ban‑RB6518 Eyeglasses and the lenses arrive perfectly centered. No “tunnel vision,” no constant readjustment. That’s the payoff of a careful double‑check.
One last sanity check – before you hit “Place Order,” glance at your notes one more time. Does the average feel right compared to the typical adult range (48 mm‑73 mm, with most people around 60‑64 mm)? If it’s wildly off, something went wrong and you should repeat the steps.
Now you’re ready. With a verified PD in hand, you can click through the checkout with confidence, knowing your new glasses will sit exactly where they should.
You’ve got your ruler, your mirror, and maybe a phone app—all set to nail that PD. But even seasoned DIYers slip up, and a tiny error can turn a perfect pair of glasses into a constant source of eye strain.
So, what are the most common pitfalls when you figure out how to measure pupillary distance at home, and how can you sidestep them?
It’s tempting to take the first number you see and run with it. In reality, a single measurement is like a single vote—you need a consensus.
Take at least three readings, write each one down, and look for a pattern. If you see 62 mm, 63 mm, 62 mm, the average (≈62.3 mm) is your safest bet. Skipping this step is the fastest way to end up with lenses that feel “off‑center.”
A ruler that isn’t perfectly horizontal adds a millimetre or two—enough to make progressive lenses feel like you’re looking through a tunnel.
When you press the ruler against your nose, the tape gives you a visual anchor that won’t slide. Check the reflection: if the top edge of the ruler looks higher on one side, adjust until it’s level.
Dim lighting hides the dark centre of your pupils, leading you to guess instead of see. The Zeelool guide notes that inaccurate PD can cause blurry vision and headaches—a clear sign that lighting matters according to eye‑care experts.
Turn on a bright desk lamp or stand near a window with natural light. A soft, diffused glow reduces glare and makes the pupil centers pop. If you’re using a phone app, make sure the screen isn’t reflecting back into your eyes.
Most people measure a single “total” PD, but if you need multifocal or progressive lenses, the distance from each eye to the bridge (monocular PD) matters more.
To capture it, measure the distance from the centre of each pupil to the bridge separately, then record both numbers (e.g., 31 mm / 30 mm). Feeding those exact values into the order form can be the difference between seamless vision and constant refocusing.
A ruler with faded markings or a metric‑only scale can mislead you. Even a half‑millimetre error shows up on high‑prescription lenses.
Grab a ruler with clear, un‑worn millimetre lines. If you only have an inch‑scale ruler, use a conversion chart, but double‑check the math. Better yet, keep a cheap millimetre ruler on hand for future orders.
And remember: the average adult PD hovers between 54 mm and 78 mm, with most people landing in the low‑60s. Anything far outside that band deserves a second look.
By watching out for these common mistakes, you’ll turn “maybe it’s right” into “I’m 100 % confident.” That confidence means you can hit “Place Order” without second‑guessing the fit, and you’ll enjoy glasses that truly feel like they were made for you.
Pupillary distance (PD) is the measurement between the centers of your pupils. It tells the lab where to place the optical centre of each lens so you see clearly through the sweet spot of the prescription. If the PD is off, even a perfect prescription can feel blurry or cause eye strain, especially with single‑vision or progressive lenses. In short, a correct PD is the secret to glasses that feel custom‑made.
Absolutely. The ruler‑and‑mirror method works solo; just use a piece of tape on the zero mark to keep the ruler from sliding. Stand about 20 cm from a well‑lit mirror, align the zero with one pupil, then note where the other pupil falls. Take three readings, write them down, and average the numbers. A steady hand and a calm mindset are all you need.
Bright, diffused light is key. Natural daylight from a nearby window or a white‑LED desk lamp works wonders. Avoid harsh overhead lights that cast shadows on your eyes. If you’re using a phone flashlight, point it toward your face rather than the mirror to eliminate glare. Good lighting makes the dark centres of your irises pop, letting you read the ruler without guessing.
We recommend at least three separate readings. Write each result down immediately—memory tricks can lead to a half‑millimetre error. If the three numbers cluster (for example, 62 mm, 63 mm, 62 mm), you can feel confident. If they jump around, pause, reset the ruler, and try again. Averaging consistent readings smooths out tiny hand tremors and gives you a reliable PD.
Total PD is the distance from the centre of one pupil to the centre of the other—what most people measure at home. Monocular PD breaks that distance into two separate values (right eye to bridge, left eye to bridge) and is essential for progressive or high‑prescription lenses. If your glasses are single‑vision, total PD is fine; for multifocals, take the extra step to note each eye’s distance.
Typical slip‑ups include a tilted ruler, measuring in dim light, and forgetting to focus on a distant object. A ruler that isn’t perfectly horizontal adds a millimetre or two, and poor lighting hides the pupil centre, forcing you to guess. Also, using an inch‑scale ruler without converting correctly can throw the whole measurement off. Double‑check the ruler’s level and keep the lighting bright.
Most adults measure between 48 mm and 78 mm, with the low‑60s being common. If your reading is noticeably lower or higher, it could be a measurement error—re‑measure using the same method or ask a friend to help. In rare cases, a truly atypical PD does exist, and many labs can accommodate it; just be sure to verify the number before you hit “Place Order.”
We’ve walked through every step of how to measure pupillary distance at home, from setting up a well‑lit mirror to taking three steady readings and averaging them.
Remember, the key ingredients are a clear ruler, a level line across your bridge, and focusing on a distant point. A quick tap of tape on the zero mark keeps the ruler from sliding, and bright, diffused light makes those dark pupils pop.
If any number feels off – maybe 58 mm when most of us sit in the low‑60s – pause, re‑measure, or ask a friend for a second opinion. A single outlier can usually be traced to a tilt or a blink.
Once you have a consistent average, jot it down and use it on the BuyEyeglass checkout. The right PD means lenses sit right over your eyes, eliminating strain and giving you that “just‑right” feel the first time you put the glasses on.
So, what’s next? Grab your notes, double‑check the average, and place your order with confidence. A few minutes of careful measuring now saves you weeks of adjustment later – and that’s the real payoff of getting your PD right.
And if you ever need a refresher, just flip back to the checklist we’ve built – a reminder that a perfect PD is only a ruler away.